B91 Zigbee Direct Demonstration User Guide
Zigbee Direct Protocol Introduction
The intent of Zigbee Direct is to allow for encrypted and authenticated access to Zigbee devices and networks from Bluetooth Low Energy(BLE) capable devices. This enables devices like smartphones, tablets, smart speakers and hubs to commission and control devices on a Zigbee network.
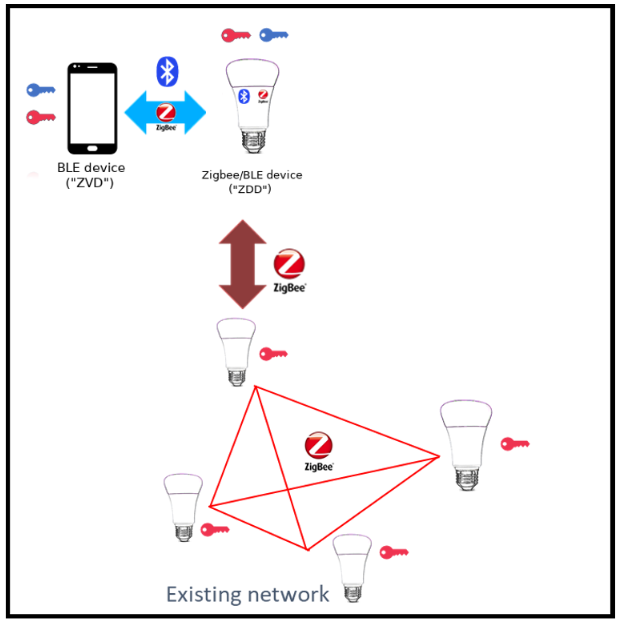
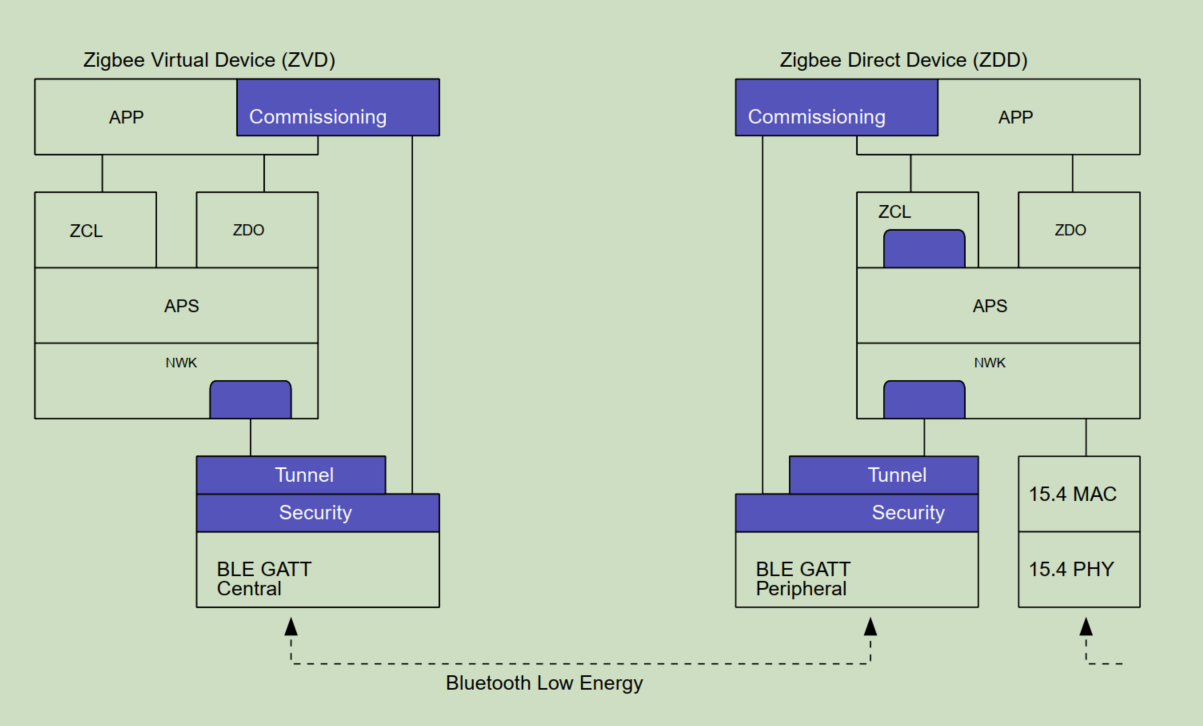
The BLE services included in Zigbee Direct: Security Service, Commissioning Service and Tunnel Service.
Document Purpose
This document mainly introduces the typical application of Telink Zigbee + BLE dual-mode ZDD(Zigbee Direct Device) device.
It contains three typical examples:
(1) The host computer tool controls the dual-mode ZDD device (Zigbee coordinator) to form Zigbee network through BLE, and allows the single-mode Zigbee device to join its network and can communicate with each other;
(2) The host computer tool controls the dual-mode ZDD device (Zigbee Router) through BLE to join the existing Zigbee network and can communicate with each other;
(3) The host computer tool simulates the ZVD device to join the Zigbee network formed by the dual-mode ZDD device and can communicate with each other.
Note:
- ZVD and ZDD use "security mode 1" and "security level 1" to establish BLE connections, without pairing and binding process.
- The key negotiation method in Security Service only supports: using Curve25519 with Hash AES-MMO-128.
- Pre-configured key type supports:
Pre-configured link-key derived from installation code
Basic Authorization Key
ECDHE using Curve25519 with Hash AES-MMO-128
Anonymous Well-Known Secret- The data in the dialog box of "Data In/Out" on the "Commission" and "Tunnel" pages of the host computer tool is displayed after decryption. The actual BLE air data is encrypted, and the key is negotiated during the session establishment process.
Hardware and Software Requirement
Hardware Requirement
B91 Zigbee Direct Development Kit
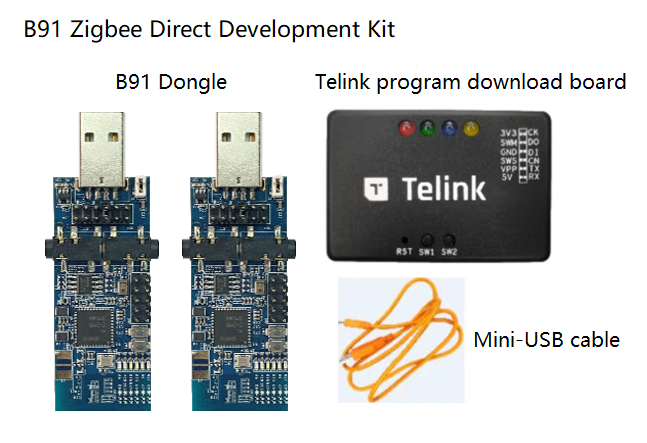
Hardware Introduction
| Category | Chip part number | Development board external name | Quantity |
|---|---|---|---|
| Zigbee+BLE dual-mode device | 9518A | B91 Dongle | 1 |
| Zigbee single-mode device | 9518A | B91 Dongle | 1 |
Note:
They can be purchased on Taobao.com. If they are not listed in the store, please contact Telink FAE to buy B91 Zigbee Direct development kit.
Hardware Reference Design
- Section Development Kit and Application Boards under page Telink wiki
Software Requirement
- Download Tool
- Zigbee SDK
- Zigbee Direct SDK (Telink internal link, please contact FAE to get the file)
- Test tool source code on PC side-Zigbee Direct Test Tool (Telink internal link, please contact FAE to get the file)
ZDD Form the Network
Topology Example
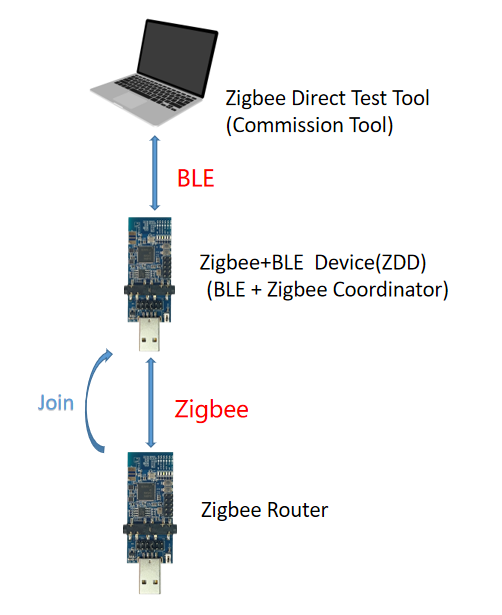
BIN File
The BIN file downloaded from the ZDD device is compiled for the sampleGW example in the dual-mode SDK, and the BIN files downloaded from the Zigbee Router device is compiled for the sampleLight sample in the Zigbee SDK.
Before downloading the BIN file, please erase the saved data of the module to avoid the existing data in Flash affecting the test.
After the BIN file is successfully downloaded, power on the module, and the red light on the module will be on.
Operation Steps
Establish BLE Connection
Open the computer-side test tool-Zigbee Direct Test Tool, click the "Start Scan" button, wait for the scan results, and then select the ZDD device in the scan results, click the "Start Connect" button to initiate the BLE connection. During the connection process, the tool will discover all the attributes of the device, so the connection time will be slightly longer.
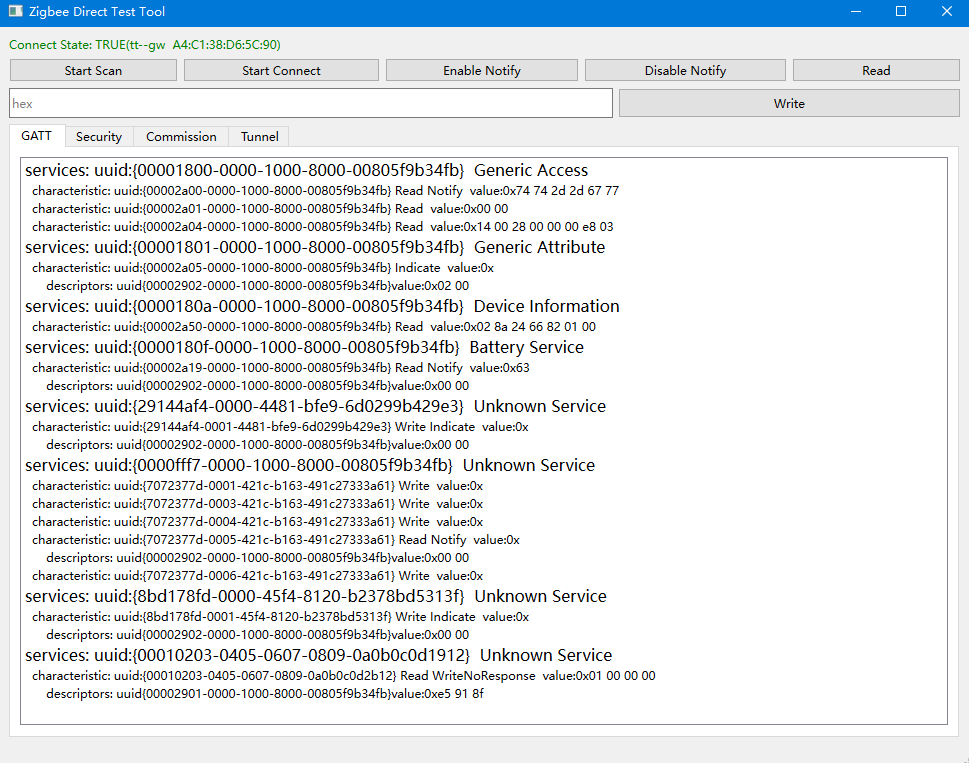
Establish Configuration Session
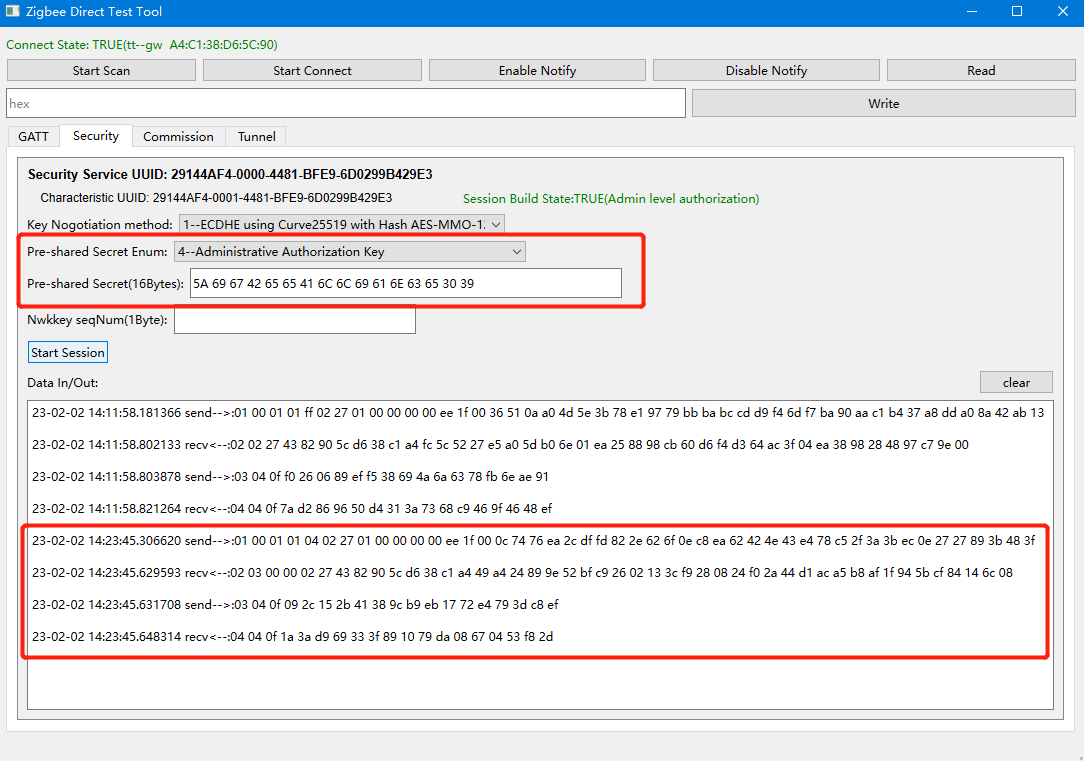
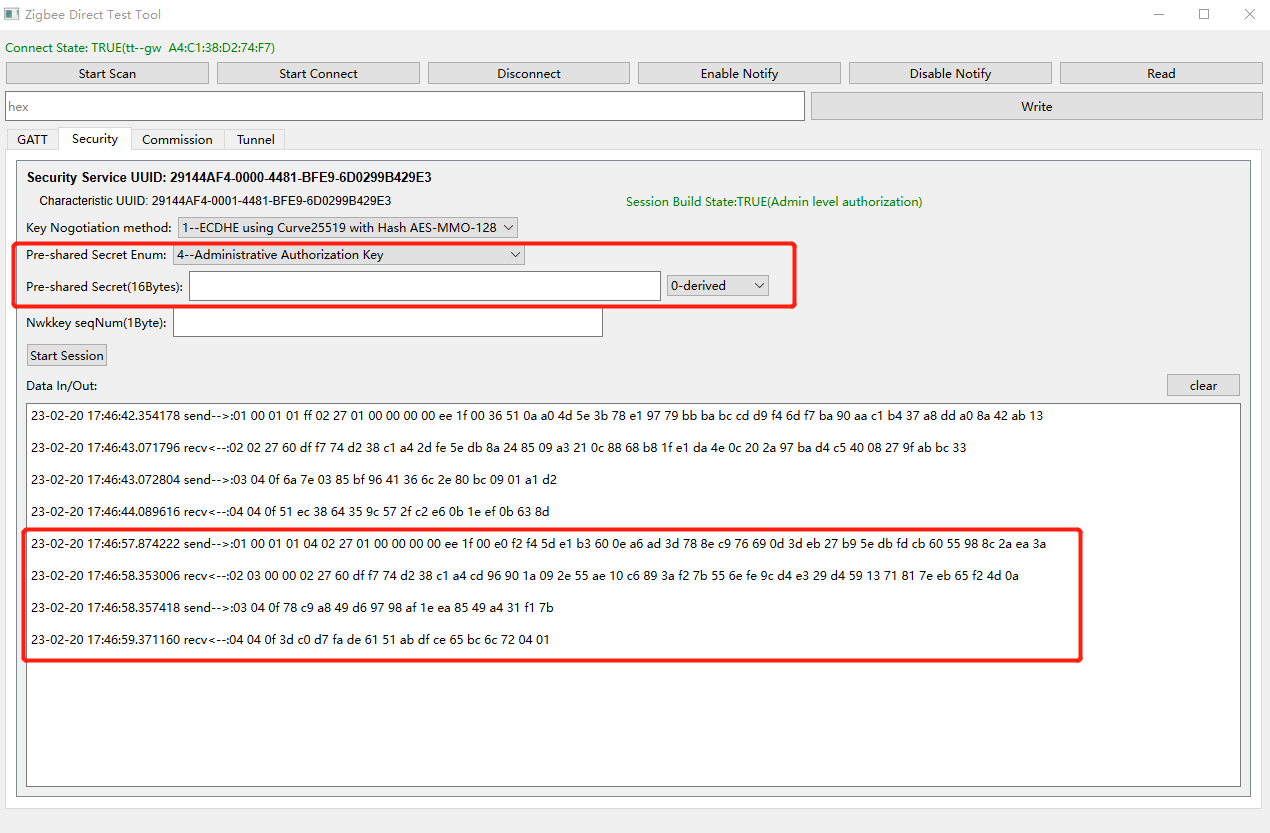
Switch to the "Security" page, click the "Start Session" button according to the default configuration, establishe configuration session, and negotiate the configuration session key. The "Data In/Out" dialog box displays the interactive data of the session establishment process.
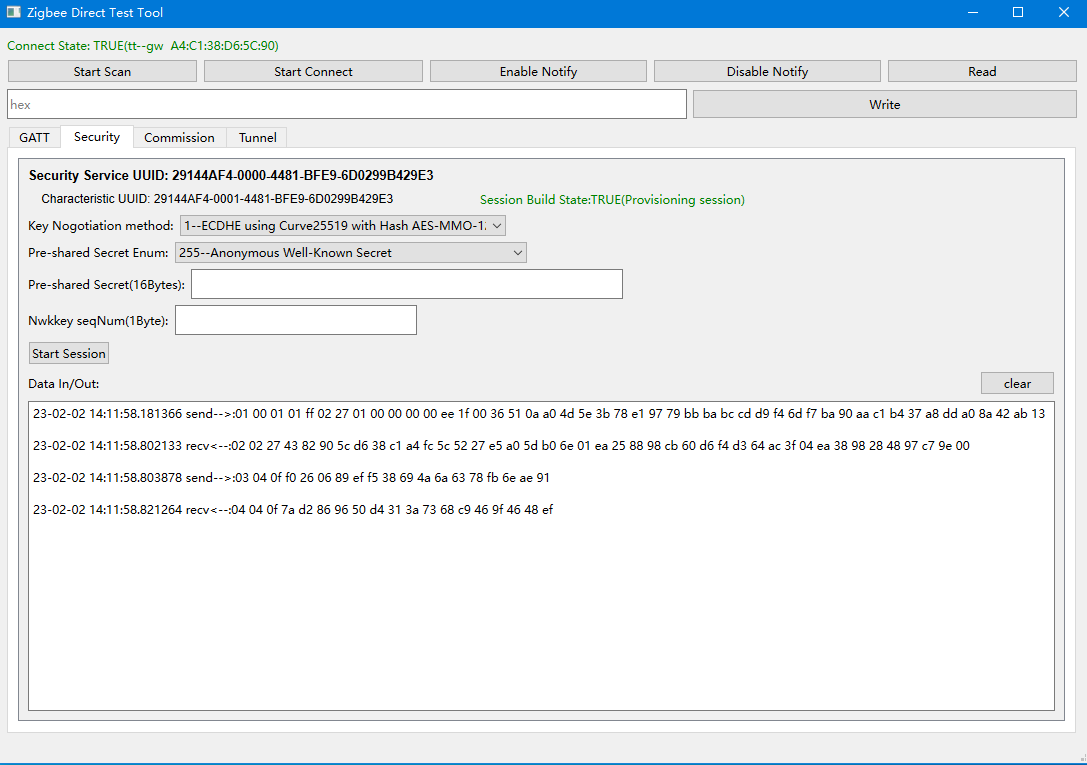
ZDD Form the Network
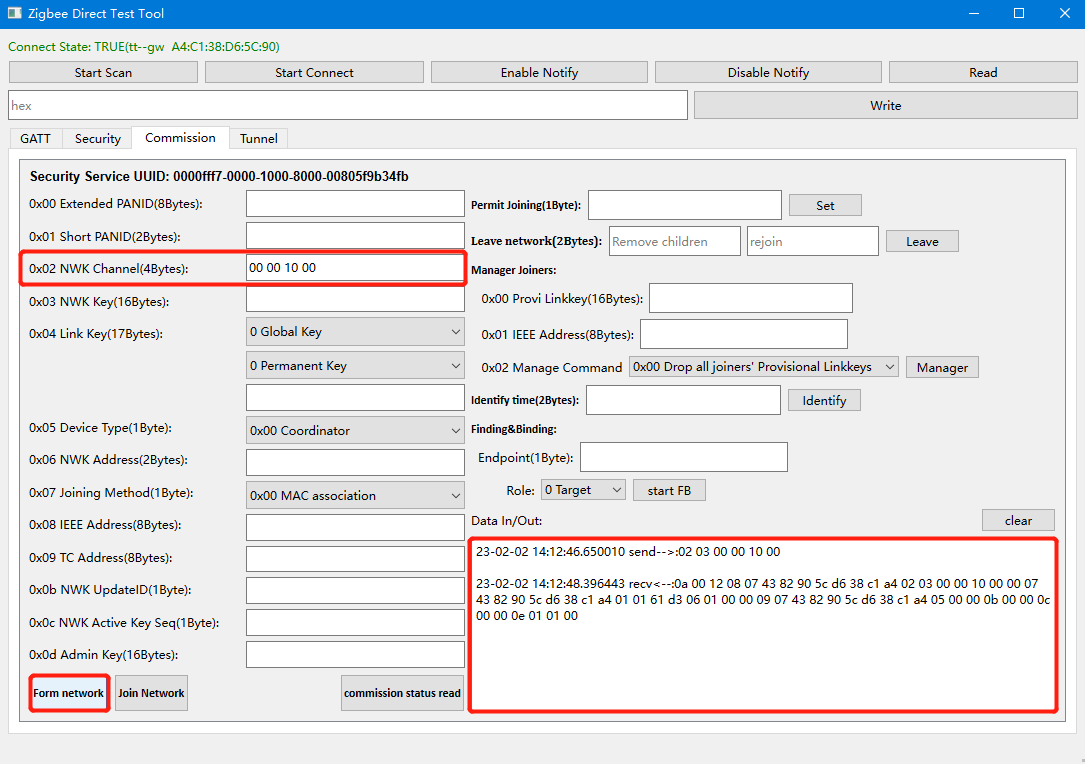
Switch to the "Commission" page, configure the networking parameters in the left area of the page, and then click the "Form network" button to initiate the networking, ZDD will report the networking results and network parameters.
Only "NWK Channel" is configured here, and the communication data is in the "Data In/Out" dialog box.
The networking parameters are packaged using the "TLV" format.
| Name | Usage | Type ID | Length (Byte) | Description |
|---|---|---|---|---|
| Admin Key | Optional | 0x0d | 16 | It is used to establish an Admin-level authorization session. If it is not configured, TCLK is used by default in the centralized network. In the distributed network, if it is not configured, the Admin session cannot be established. |
| Trust Center Address | Required(conditionally) | 0x09 | 8 | When forming a distributed network, it must be configured and fully ff; If it is a centralized network, it does not need to be configured. |
| Extended PAN ID | Optional | 0x00 | 8 | If not configured, the networking device will select a random number. |
| Short PAN ID | Optional | 0x01 | 2 | If not configured, the networking device will select a random number. |
| Network Channel | Optional | 0x02 | 4 | If not configured, the networking device will scan the full channel to select the working channel. |
| Network Key | Optioanl | 0x03 | 16 | If not configured, the networking device will select a random number as the key. |
| Link Key | Optional | 0x04 | 17 | If not configured, the pre-install code or the default linkkey will be selected. |
| NWK Address | Optional | 0x06 | 2 | NWK Address configuration is ignored in centralized network. |
| NWK Update ID | Optional | 0x0b | 1 | If not configured, 0 is used by default. |
The devices already in the Zigbee network need to be upgraded to the Admin Authorization session and negotiate a new key before subsequent BLE communication.
Establish Admin Authorization Session
Because the Admin key is not configured during networking, the coordinator can use the default TCLK(ZigBeeAlliance09: 5A 69 67 42 65 65 41 6C 6C 69 61 6E 63 65 30 39) to derive the Admin key in the centralized network.
The pre-configured key type is selected as "Administrative Authorization Key".
Zigbee Device Joins the Network
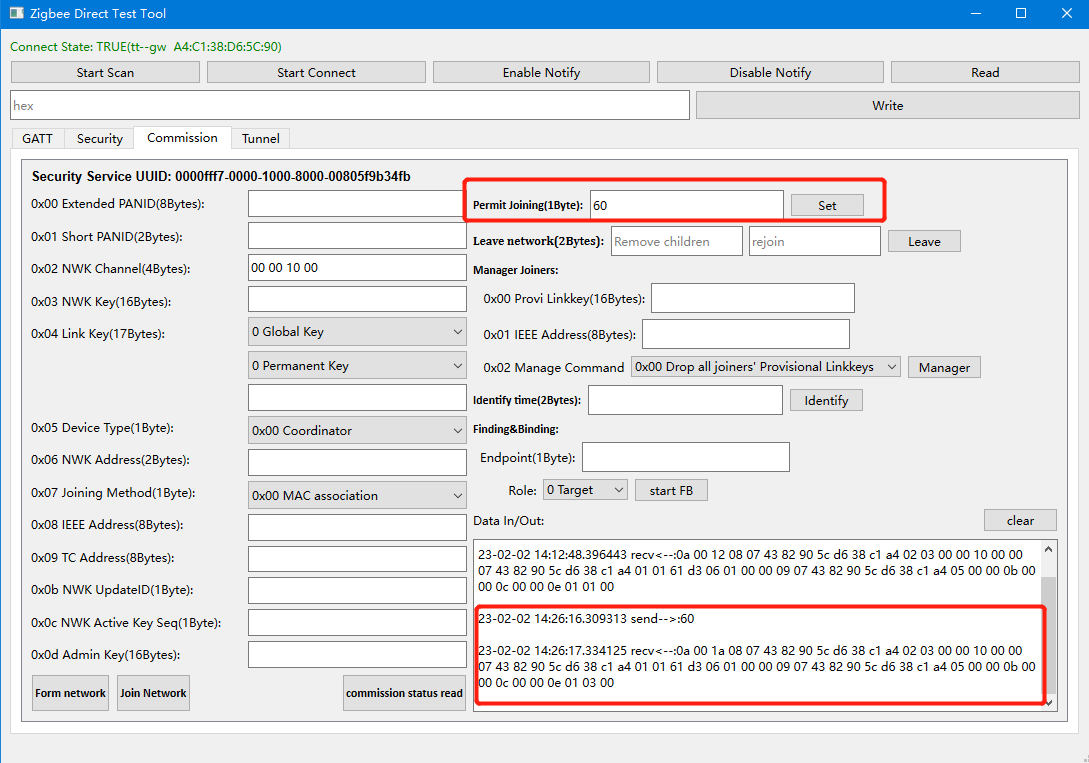
Switch to the "Commission" page and fill in the allowed time to join the network in the input box after "Permit Joining", and turn on the allowed network access switch of ZDD, as shown below. After success, the green light on the ZDD module will light up.
After the single-mode Zigbee device joins the network, the green light of the ZDD device will also light up. Press "SW2" on the ZDD module, the ZDD will broadcast the on/off command at an interval of 1 second, and the red light on the single-mode Zigbee module will flash along with it, and press the "SW2" button again to stop flashing.
ZDD Joins Existing Zigbee Network
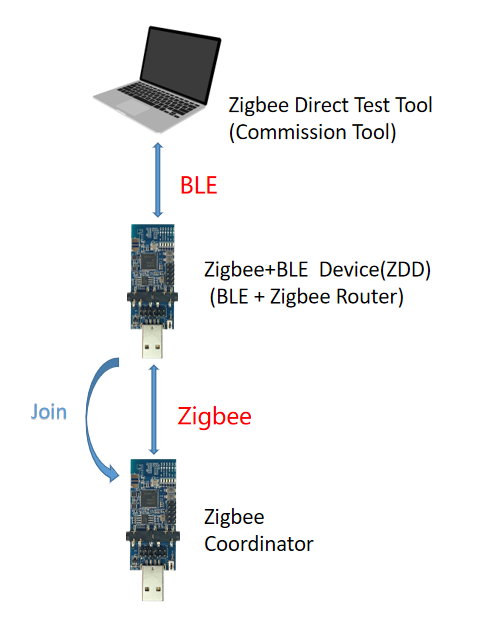
Topology Example
BIN File
The BIN file downloaded from the dual-mode ZDD device is compiled for the sampleLight sample in the dual-mode SDK, and the BIN file downloaded from the single-mode Zigbee Coordinator device is compiled for the sampleGW sample in the Zigbee SDK.
Before downloading BIN files, please erase the entire Flash module to avoid the existing data in the Flash affecting the test.
After the BIN file is downloaded successfully, power on the module and the red light on the module will be on.
Operation Steps
Establish BLE Connection
Open the computer-side test tool-Zigbee Direct Test Tool, click the "Start Scan" button, wait for the scan results, and then select the ZDD device in the scan results, click the "Start Connect" button to initiate the BLE connection.
Establish Configuration Session
Switch to the "Security" page, click the "Start Session" button according to the default configuration, and establish the configuration session. The "Data In/Out" dialog box displays the interactive data of the session establishment process. Subsequent communication data need to be encrypted and decrypted using the key negotiated here.
Form a Zigbee network
Single-mode Zigbee Coordinator module forms a network, and will allow the switch to join the network to be turned on, the green light on the module will be on.
ZDD Joins the Network
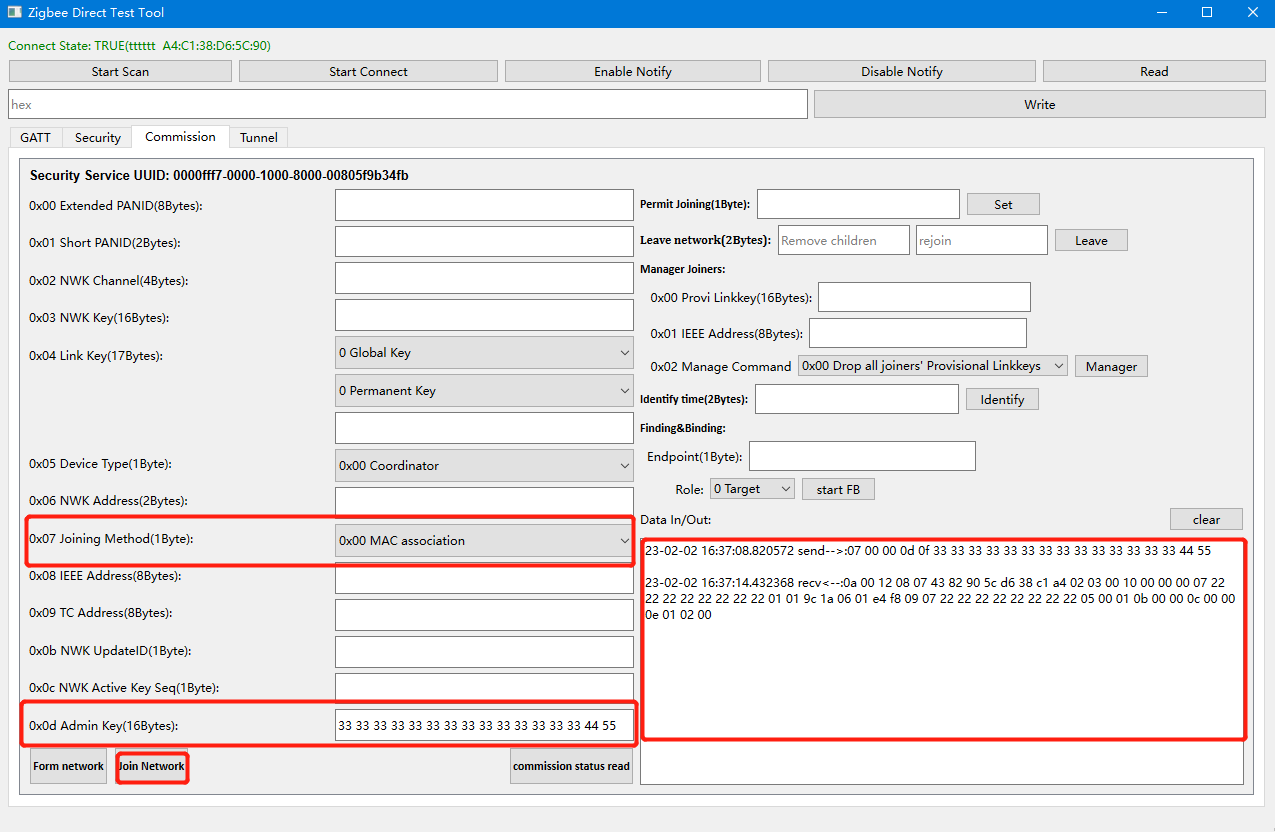
Switch to the "Commission" page, configure the parameters of joining the network in the left area of the page, and then click the "Join network" button to initiate the joining of the network, and ZDD will report the network joining results and network parameters. By default, the switch that allows the ZDD device to join the network is turned off, so the green light will not be on here. "Joining Method" and "Admin Key" (33 33 33 33 33 33 33 33 33 33 33 33 33 33 44 55) are configured here. The communication data is in the "Data In/Out" dialog box.
After joining the network, press the "SW2" button on the Zigbee Coordinator module, the Zigbee Coordinator module will broadcast the on/off command at an interval of 1 second. The red light on the ZDD module will flash along with it, and press the "SW2" button again to stop flashing.
The networking data is packaged using the "TLV" format.
| Name | Usage | Type ID | Length (Byte) | Description |
|---|---|---|---|---|
| Joining Method | Required | 0x07 | 1 | Configurable mode: MAC association, secure rejoining,Out-of-band Commissioning. |
| Admin Key | Optional | 0x0d | 16 | It is used to establish an Admin-level authorization session.If it is not configured, TCLK is used by default in the centralized network. In the distributed network, if it is not configured, the Admin session cannot be established. |
| Trust Center Address | Required(conditionally) | 0x09 | 8 | When forming a distributed network, it must be configured and fully ff; If it is a centralized network, it does not need to be configured. |
| Extended PAN ID | Optional | 0x00 | 8 | Join the network that the Extended PAN ID and configuration are the same. |
| Network Channel | Optional | 0x02 | 4 | Find devices that can join the network on the configured channel. |
| Link Key | Optional | 0x04 | 17 | Pre-configure linkkey. |
| NWK Address | Optional | 0x06 | 2 | If not configured, select random address. |
The devices already in the Zigbee network need to upgrade the session to the Admin Authorization session and negotiate a new key to perform subsequent "Commissioning Service" data interaction.
Establish Admin Authorization Session
Since the Admin key has been configured when accessing the network, there is no need to configure it again, and select "Administrative Authorization Key" as the pre-configured key type to establish a session.
ZDD Device Turns on the Join Network Switch
Switch to the "Commission" page and fill in the allowed time to join the network in the input box after "Permit Joining", which can control the allowed join network switch of the entire network.
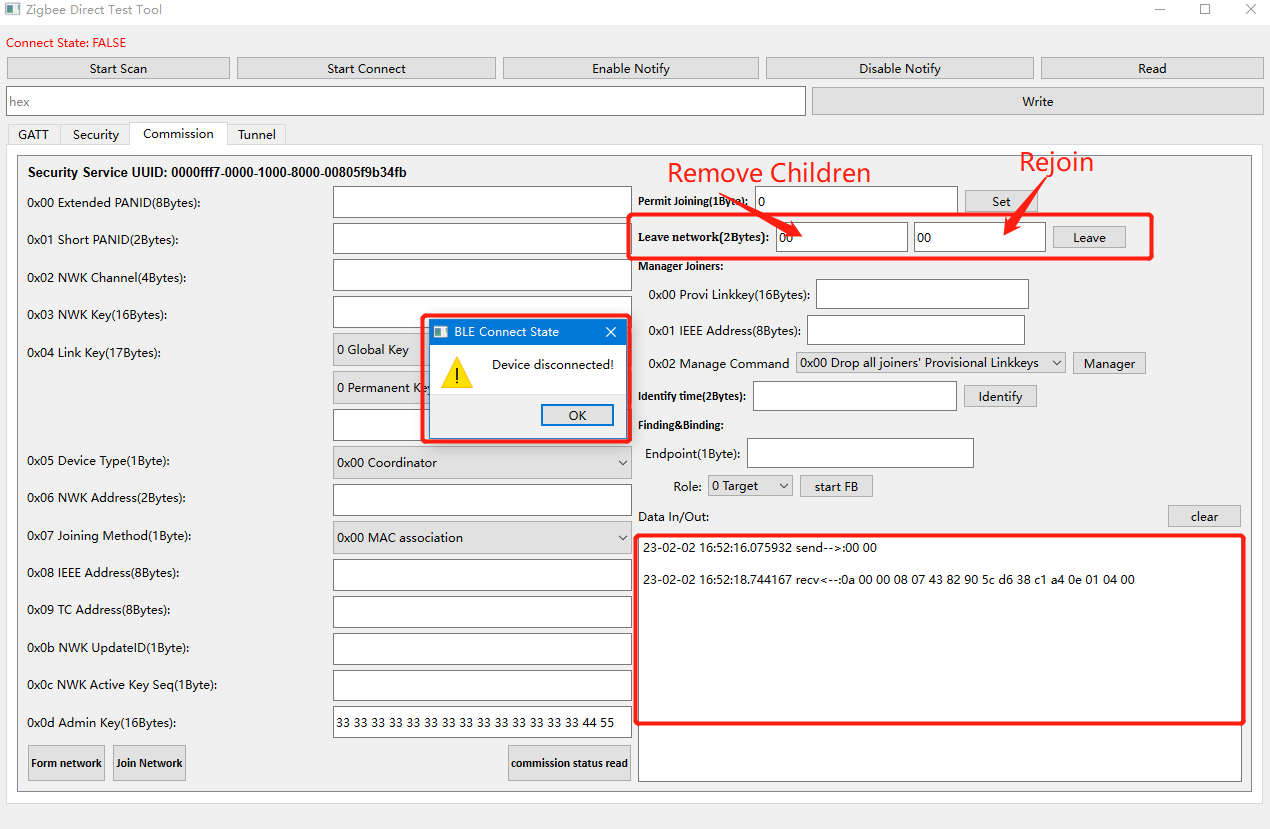
ZDD Device Leaves the Network
On the "Commission" page, use the "Leave network" command to leave the network. After the ZDD device leaves the network, the BLE connection will also be actively disconnected.
ZVD Joins ZDD's Zigbee Network
Topology Example
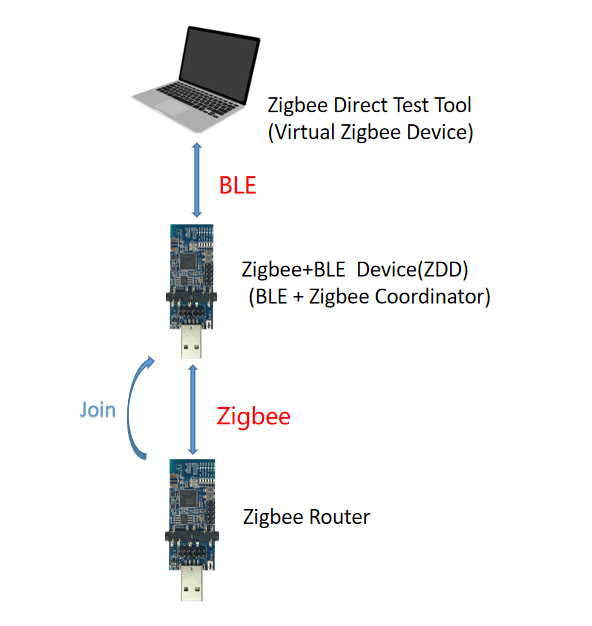
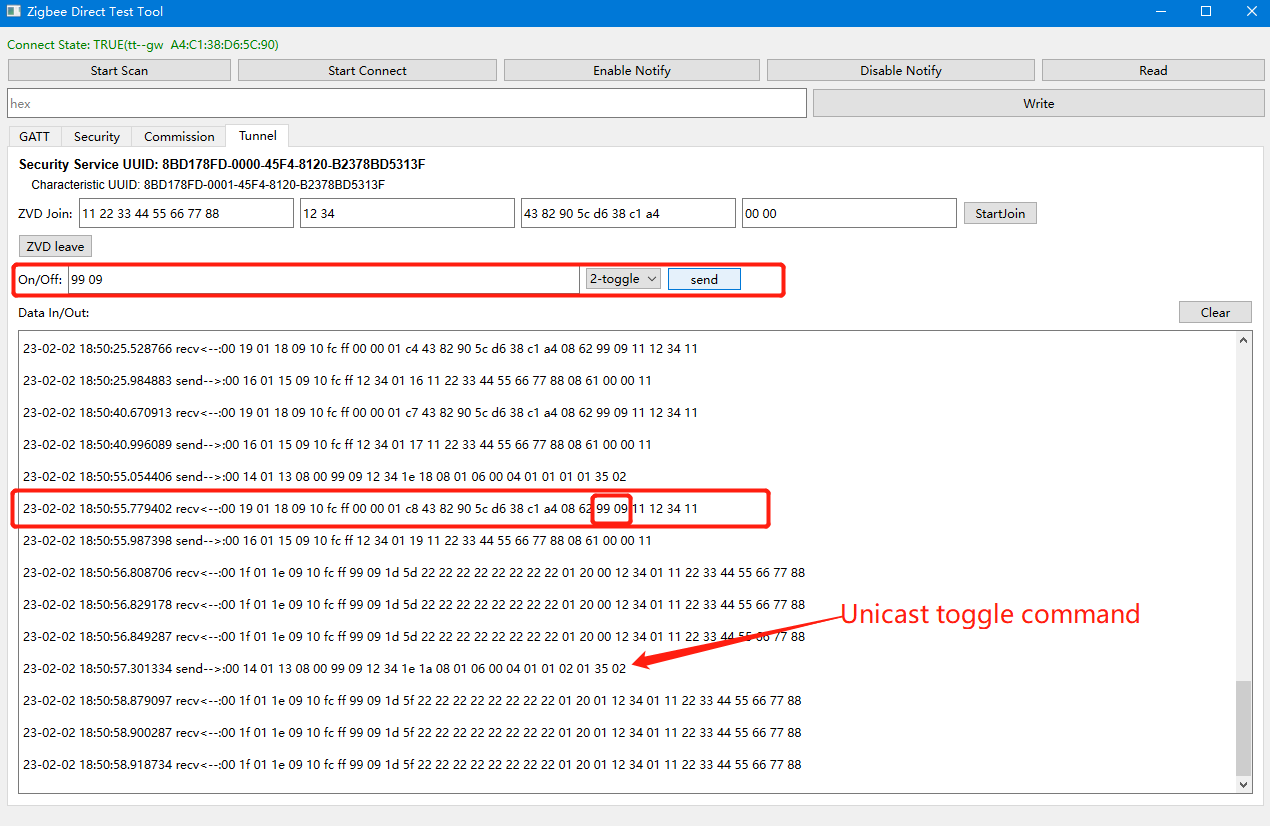
The host computer tool simulates the Zigbee Router device and transmits Zigbee network data through the BLE channel, which requires Security Service and Tunnel Service. Tunnel data is also encapsulated in TLV format.
The host computer tool does not implement the Zigbee protocol stack, and we can only test the join network and on/off commands.
Operation Steps
Form a Zigbee Network
According to the section "ZDD Form the Network", make ZDD form the network, and the single-mode Zigbee Router device has joined the network, and then re-establish the BLE connection.
Establish Configuration Session
The devices that are already in the Zigbee network need to turn on the allowed join network switch when establishing a configuration session. Press the "SW7" button on the ZDD module to turn on the switch of allowing the device to join the network, and the green light on the module will be on.
Use the default configuration parameters of the tool to establish a configuration session and negotiate the key of the configuration session.
ZVD Joins Zigbee Network
Ensure that the switch of allowing ZDD to join the network has been turned on before ZVD starts to join the network.
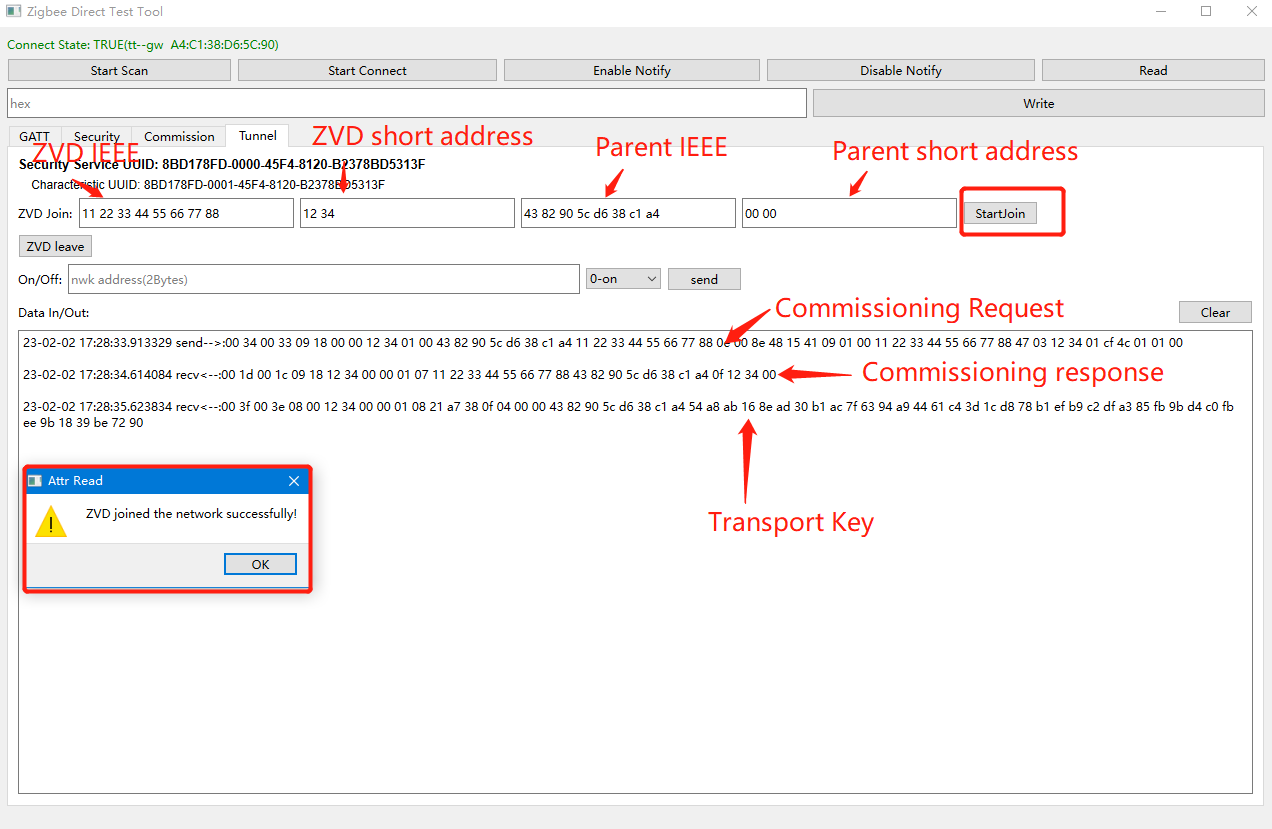
Switch to the "Tunnel" page, set parameters in the input box after "ZVD Join", and then click "StartJoin" to let ZVD join the known network. "ZVD IEEE" and "ZVD short address" are randomly selected and can be specified by users. "Parent IEEE" and "Parent short address" are parameters of the parent node ZDD.
Establish Basic Authorization Session
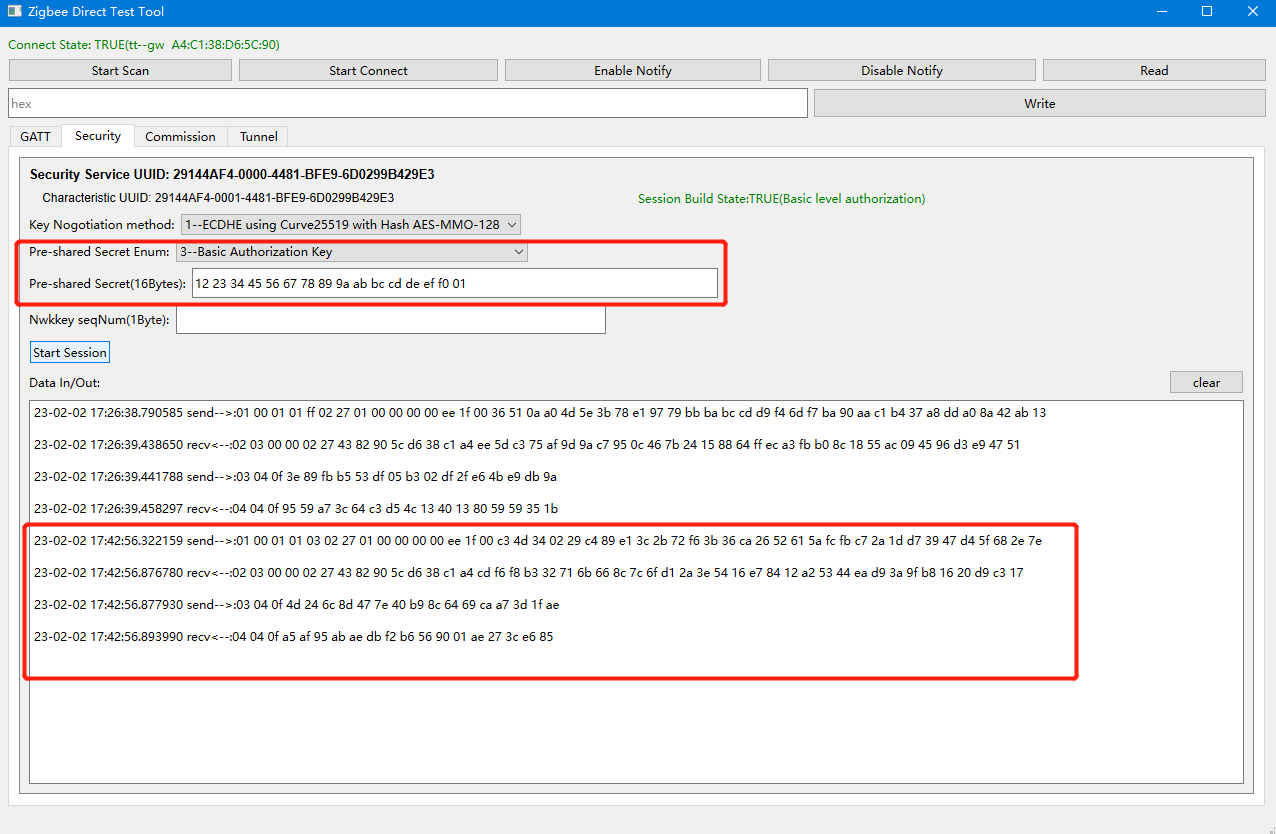
The host computer tool switches to the "Security" page, the pre-configured key type selects "Basic Authorization Key", select the network key of the current network as the pre-configured key, and establish the Basic Authorization session.
The pre-configured key can be derived from the "transport key" command data received by the ZVD device when it joins the network. The current tool does not implement this function, so it is entered manually here.
ZVD Device Controls Zigbee Network Device
After the ZVD device joins the Zigbee network and establishes a "Basic Authorization" session, it will send a "Device announce" command once and a "Link Status" command every 15 seconds.
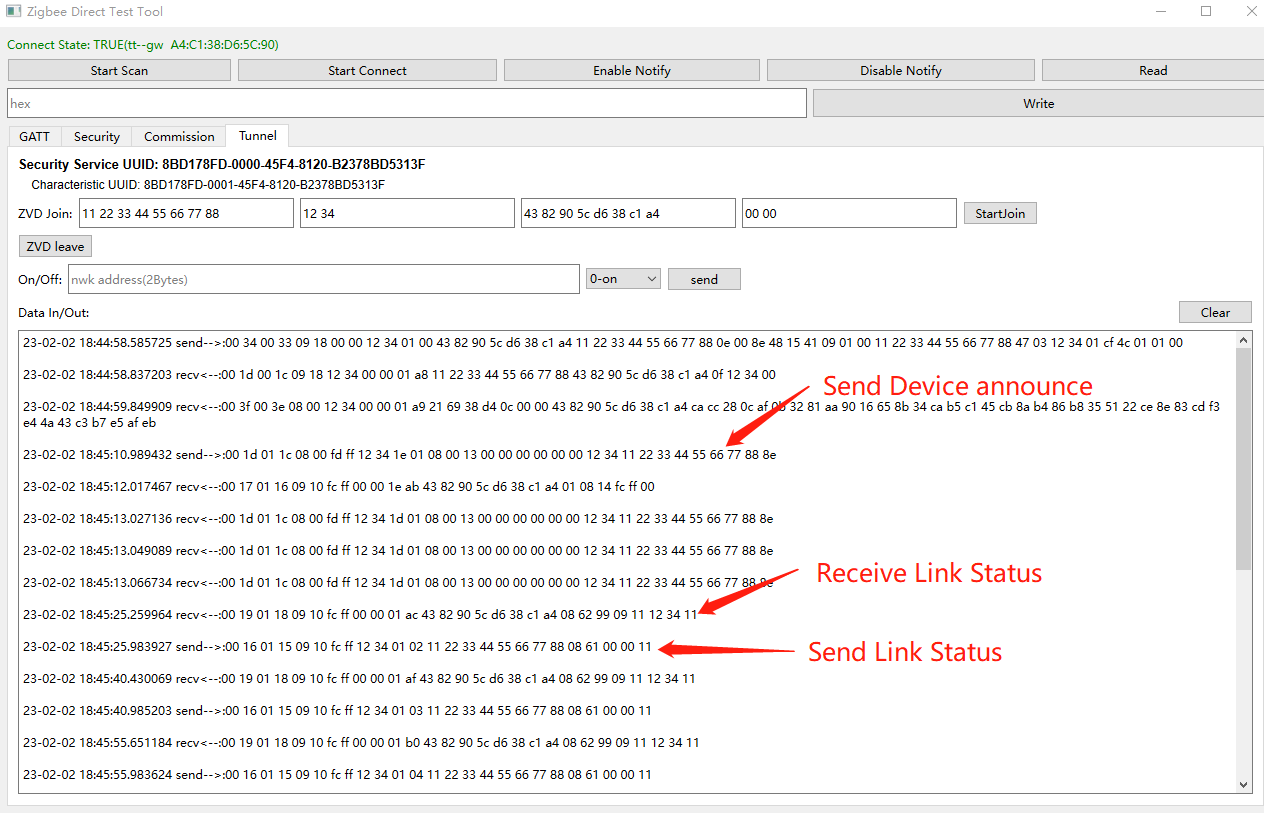
Fill in the address of the device to be controlled in the input box after "On/Off", click the "send" button to send the command, and you can see that the red light on the device will turn off.
