tl_bluetooth_audio_sdk Get Started
Overview
About This Document
This document aims to help users quickly build a software development environment for audio applications based on Telink TL322x, TL751x, TL721x, TLSR952x, and other series of hardware. Through a simple project, you will learn how to use tl_bluetooth_audio_sdk (hereinafter referred to as SDK) to develop audio applications.
Scope
For details about the applicable chip models, corresponding development boards, development platforms, and SDK versions of this document, please refer to the latest Release Notes.
Note
- After opening the Release Notes page, select the Release Notes corresponding to the SDK version currently in use from the drop-down list on the left.
Hardware and Software Requirements
Before starting, please ensure that the following hardware and software are prepared:
| Hardware | Description |
|---|---|
| Development board | Select the corresponding development board according to the target chip series (see Release Notes for details) |
| Telink Programmer | Programmer V1.0 - V3.0 is recommended |
| PC | Operating system: Windows 10/11 / Linux |
| USB-to-UART module | Used for UART log output and debugging |
| USB data cable | Used to connect the programmer and PC |
| Dupont wire | Used to connect the development board with the programmer and USB-to-UART module |
| Software | Description |
|---|---|
| IDE | Telink IoT Studio |
| Programming tool | BDT (Burning and Debugging Tool) |
| Host software | TelinkBluetoothTool (Windows only) |
| SDK | tl_bluetooth_audio_sdk |
IDE Installation and Configuration
Telink IoT Studio provides a standalone installation package, with the toolchain required for compilation already integrated, requiring no additional installation. Meanwhile, the SDK has completed the default toolchain configuration, and you do not need to manually select the version.
Please download the corresponding installation package according to your operating system:
-
Windows: TelinkIoTStudio_V2025.2.zip
Installation Steps:
Windows environment:
(1) Extract the downloaded .zip package, run TelinkIoTStudio_V2025.2.exe, and follow the installation wizard to complete the installation.
(2) After installation is complete, you must run TelinkIoTStudio Updater.exe to obtain the latest component updates.
Linux environment:
(1) Grant execution permission to the installation package according to the operating environment.
(2) Run Telink_IoT_Studio_2025.2_Installer.run, and complete the installation according to the terminal prompts.
Obtaining the SDK
You can download the SDK package from GitHub.
After the download is complete, extract the SDK package to a custom path.
SDK Directory Structure
The directory structure and descriptions of tl_bluetooth_audio_sdk are as follows:
tlk_bluetooth_sdk/
├── boot/      # Provides project compilation and linking related configurations
├── common/    # Provides common cross-chip series processing functions, such as memory processing functions and string processing functions
├── core/      # Provides chip series configuration, module log output management, SDK version records, and other functions
├── drivers/   # Provides MCU peripheral drivers (Clock, Flash, I2C, USB, GPIO, UART, etc.)
├── stack/     # Stores protocol stack-related header files. Source files are compiled into library files and are invisible to users
├── tlkalg     # Provides encryption and audio-related algorithms
├── tlkapi/    # Provides common functions, such as flash data storage and FIFO operation interfaces
├── tlkapp/    # Encapsulates upper-layer application interfaces (audio task scheduling, Profile status processing, Key and LED configuration, etc.)
├── tlklib/    # Stores library files required for SDK operation and some open-source code
├── tlkmw/     # Middle Ware layer, integrates and manages various module functions and provides simple interfaces (BT connection/query/reconnection, etc.)
├── tlksys/    # Stores SDK system function APIs (system tasks, Timer, PM, dual-core communication, peripheral management, HAL layer, etc.)
└── vendor/    # Stores upper-layer code related to different application projects
Import the SDK into the IDE
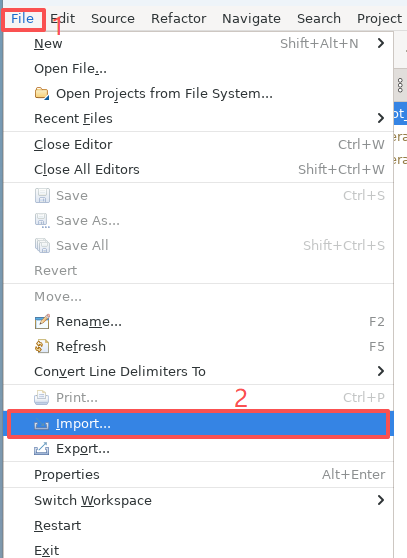
(1) Open Telink IoT Studio, click File -> Import.
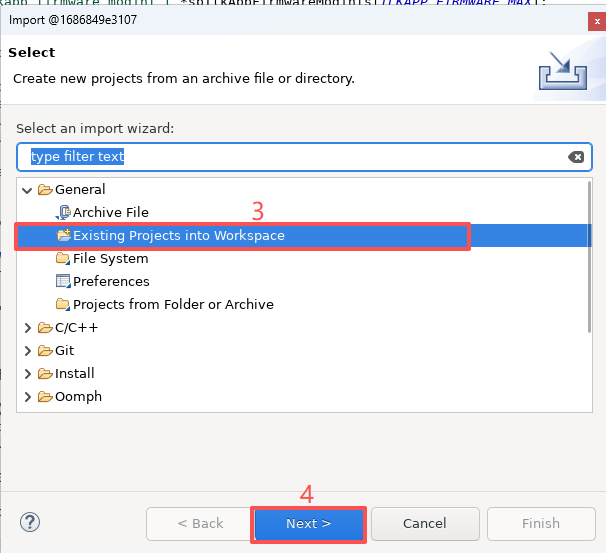
(2) Expand the General directory in the pop-up dialog, select Existing Projects into Workspace, and click Next.
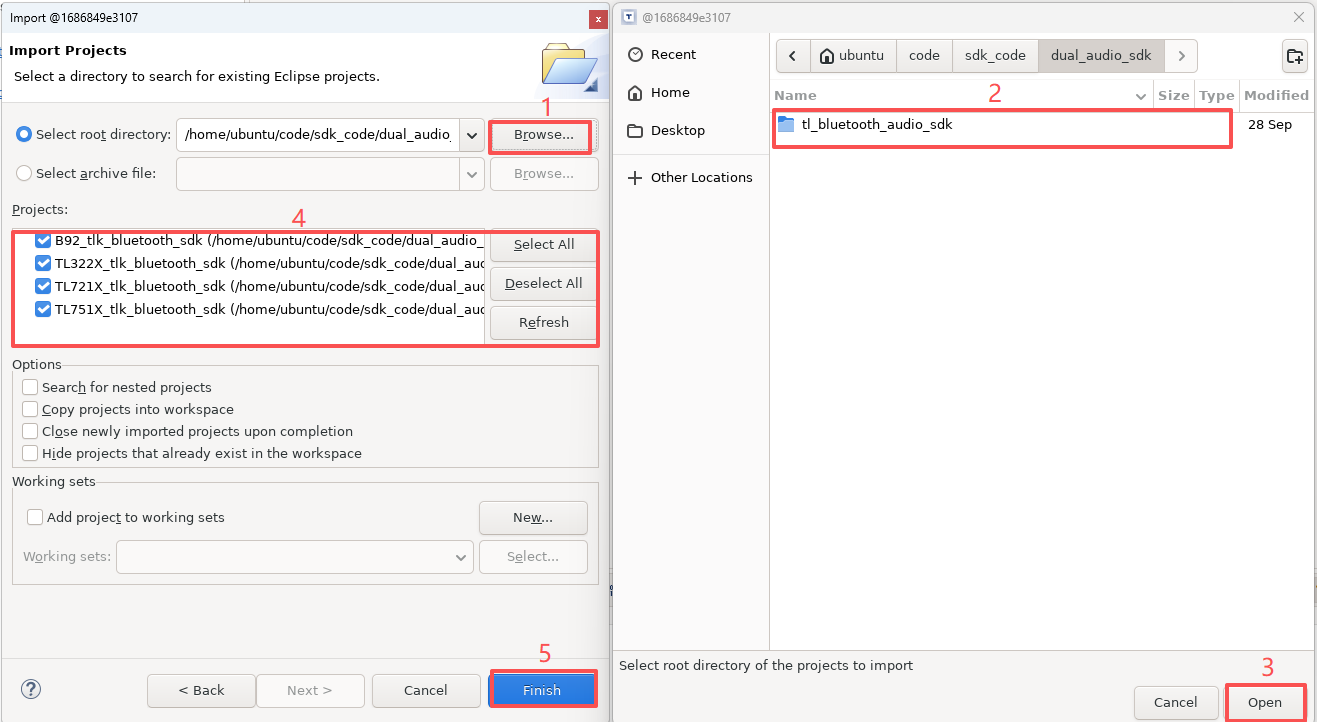
(3) In the Select root directory configuration item, click the Browse... button on the right side, select the extracted tl_bluetooth_audio_sdk, and click Open.
(4) In the Projects section, check the SDK corresponding to the target chip series, then click the Finish button in the lower-right corner to complete the import.
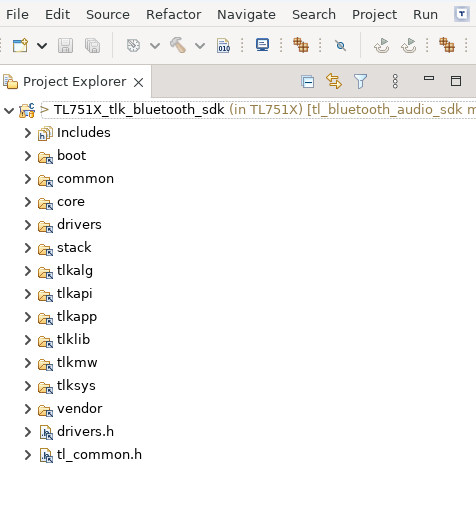
Taking the TL751x chip series SDK import as an example, the imported directory structure is shown below.
Configuration
Before compiling the project, configure functional modules, protocol stacks, OTA, and other features according to the target project and actual requirements.
The compilation configuration of each project is defined in the corresponding app_config.h file. For example, the compilation configuration of the btble_headset project is defined in \tlk_bluetooth_sdk\vendor\btble_headset\app_config.h.
Note
- Ensure that the compilation configuration defined in the corresponding project's
app_config.hfile is consistent with the hardware peripheral configuration of the target chip series. - The default SDK configuration is defined in the
\tlk_bluetooth_sdk\vendor\common\default_config.hfile.
Feature Configuration
When using the key or LED functions, enable the corresponding configurations in the app_config.h file:
#define TLK_DEV_KEY_ENABLE       1
#define TLK_DEV_LED_ENABLE       (1 && !TLK_CFG_SUSPEND_ENABLE)
#define TLK_USB_UDB_ENABLE       (1 && !TLK_CFG_SUSPEND_ENABLE)
#define TLK_CFG_USB_ENABLE       (1 && !TLK_CFG_SUSPEND_ENABLE)
Protocol Stack Configuration
When using the BT or BLE protocol stack, enable the corresponding configurations in the app_config.h file:
-
When using the BT protocol stack, the
TLK_STK_BT_ENABLEconfiguration must be enabled:#define TLK_STK_BT_ENABLE 1 -
When using the BLE protocol stack, the
TLK_STK_BLE_ENABLEconfiguration must be enabled:#define TLK_STK_BLE_ENABLE 1
Other protocol function configurations can be enabled or disabled according to actual requirements.
#define TLKBTP_CFG_RFC_ENABLE     (1 && TLK_STK_BT_ENABLE)
#define TLKBTP_CFG_SPP_ENABLE     (0 && TLKBTP_CFG_RFC_ENABLE)
#define TLKBTP_CFG_HFP_ENABLE     (1 && TLKBTP_CFG_RFC_ENABLE)
#define TLKBTP_CFG_HFPHF_ENABLE   (1 && TLKBTP_CFG_HFP_ENABLE)
#define TLKBTP_CFG_A2DP_ENABLE    (1 && TLK_STK_BT_ENABLE)
#define TLKBTP_CFG_A2DPSNK_ENABLE (1 && TLKBTP_CFG_A2DP_ENABLE)
OTA Configuration
For projects that require OTA functionality, enable the OTA function configuration in the app_config.h file of the target project:
#define TLK_MW_USER_CTRL_ENABLE       1
#define TLK_MW_OTA_ENABLE             (1 && TLK_MW_USER_CTRL_ENABLE)
Compilation and Programming
This chapter guides you through the complete development process, from selecting a project and compiling the code to finally programming and running the firmware.
Select the First Project
tl_bluetooth_audio_sdk supports multiple chip series, and each chip series contains multiple projects targeting different functions and application scenarios. The functions of the same project remain consistent across different chip series.
The supported audio applications for each chip series are as follows:
| Chip Series | Supported Audio Applications | Description |
|---|---|---|
| TLSR952x | btble_headset, btble_audio_source, le_example, bluetooth_controller | Supports LE Audio and other audio applications |
| TL751x | btble_headset, btble_audio_source, a2dp_to_bis, bttpsll_headset, bttpsll_tws, le_example, recoarding_card | Supports BT/BLE dual mode, TWS, low latency, and other audio applications |
| TL721x | tpsll_dongle, le_example, recoarding_card | Supports Telink proprietary synchronous link layer (TPSLL) and other audio applications |
| TL322x | le_example | Supports LE Audio and other audio applications |
The btble_headset project of the TL751x chip series contains BT and BLE business logic. It is a complete Headset application that can fully verify BT and BLE functions, as well as basic peripheral functions such as LED and keys.
It is recommended to select the TL751x series btble_headset project as your first project.
Compilation
Compile the TL751x Series btble_headset Project
To compile the TL751x series btble_headset project, compile the controller project first, and then compile the target project.
The detailed compilation steps are as follows:
(1) After opening Telink IoT Studio, open the imported TL751X_tlk_bluetooth_sdk (in TL751X).
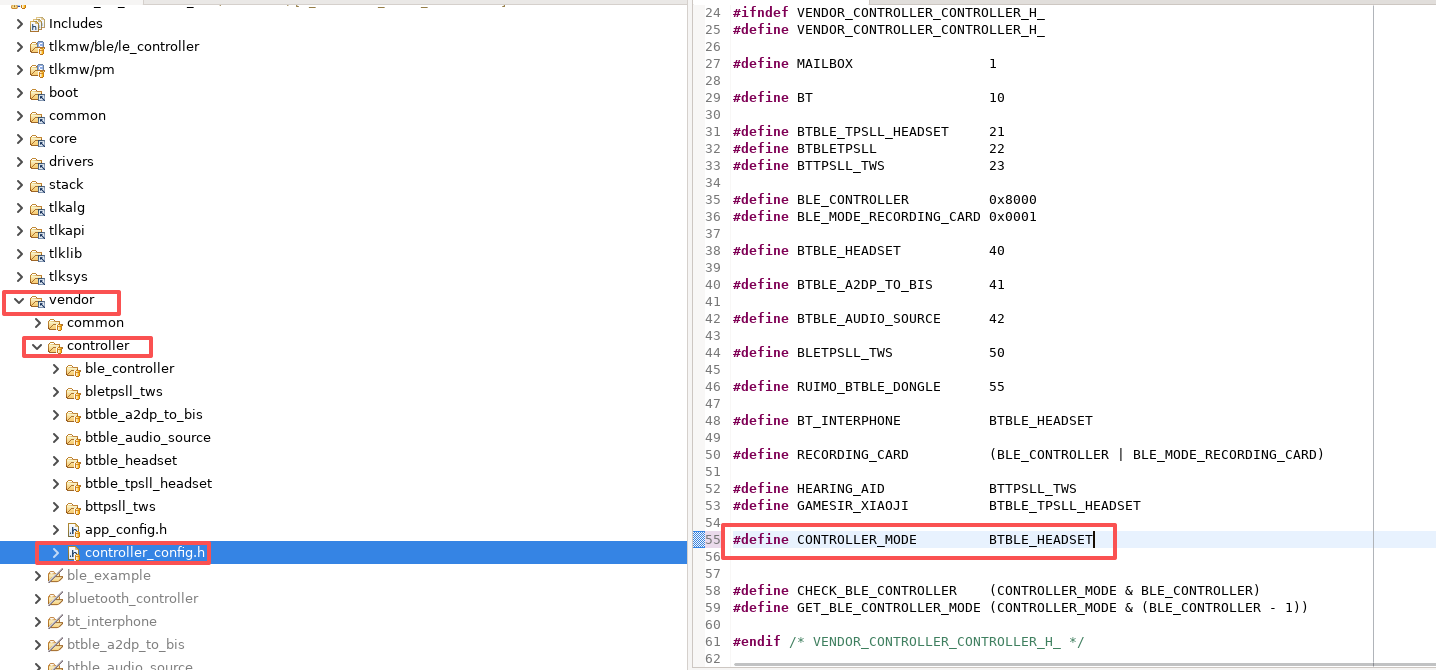
(2) Click vendor -> controller -> controller_config.h, and set CONTROLLER_MODE to the project BTBLE_HEADSET.
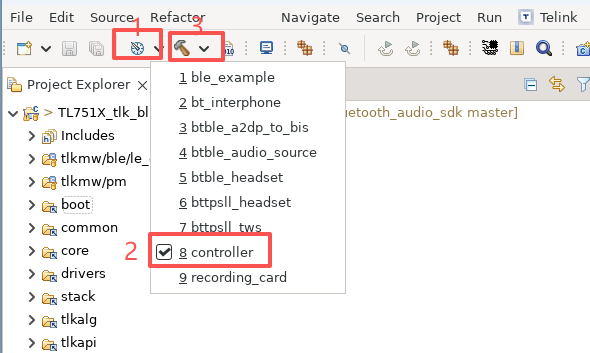
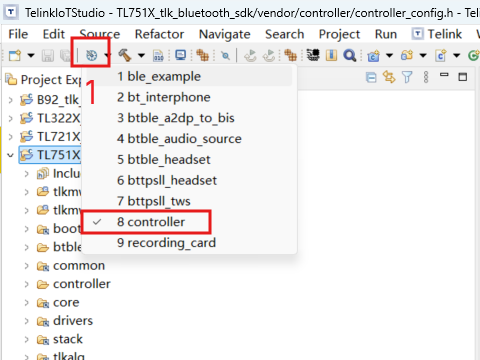
(3) Click the drop-down box of 1 to select the controller project, then click the compile button (hammer icon) to compile and wait for the compilation to complete.
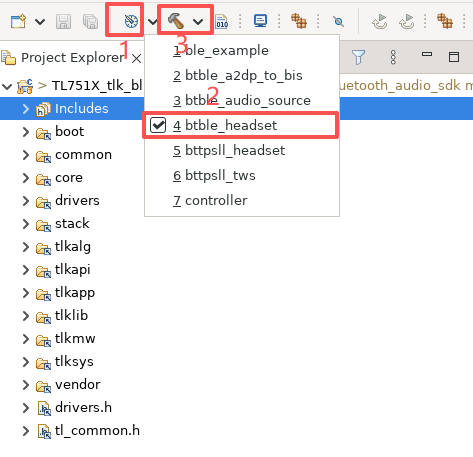
(4) Click the drop-down box of 1 to select the target project btble_headset, then click the compile button (hammer icon) to compile.
Compilation Output:
- File name: btble_headset&n22_controller_120.bin
- Path:
tl_bluetooth_audio_sdk\telink_b91m_bluetooth_sdk\tlk_bluetooth_sdk\build\TL751X\btble_headset\
Note
- After completing the above steps, refer to the Verify Compilation Success section for verification.
- If the project being developed is the TL751x series bttpsll_tws, the controller library file must be configured before compilation. See Appendix 2: bttpsll_tws Project Library File Configuration.
- If the project being developed is another TL751x series project, the compilation steps are the same as Compile the TL751x Series btble_headset Project; only replace btble_headset with the corresponding project name.
- If the project belongs to another chip series, refer to the Additional Notes section below.
Additional Notes
According to different chip series, compilation methods are divided into dual-core compilation and single-core compilation.
Dual-core Compilation (Applicable to TL751x Series):
- Compilation process: Compile the controller project first, then compile the target project.
- Automatic merging: After compilation is completed, the system automatically executes the firmware merge script to combine the dual-core firmware into a single bin file, simplifying the programming process.
- Operation steps: Refer to Compile the TL751x Series btble_headset Project.
Single-core Compilation (Applicable to TLSR952x, TL721x, and TL322x Series):
- Compilation process: Only the target project needs to be compiled, with no additional operations required.
- Operation steps: Refer to steps (1) and (4) in Compile the TL751x Series btble_headset Project.
- Output file name:
ProjectName.bin - Path:
tl_bluetooth_audio_sdk\telink_b91m_bluetooth_sdk\tlk_bluetooth_sdk\build\ChipSeries\ProjectName\
Verify Compilation Success
The method to check whether compilation is successful:
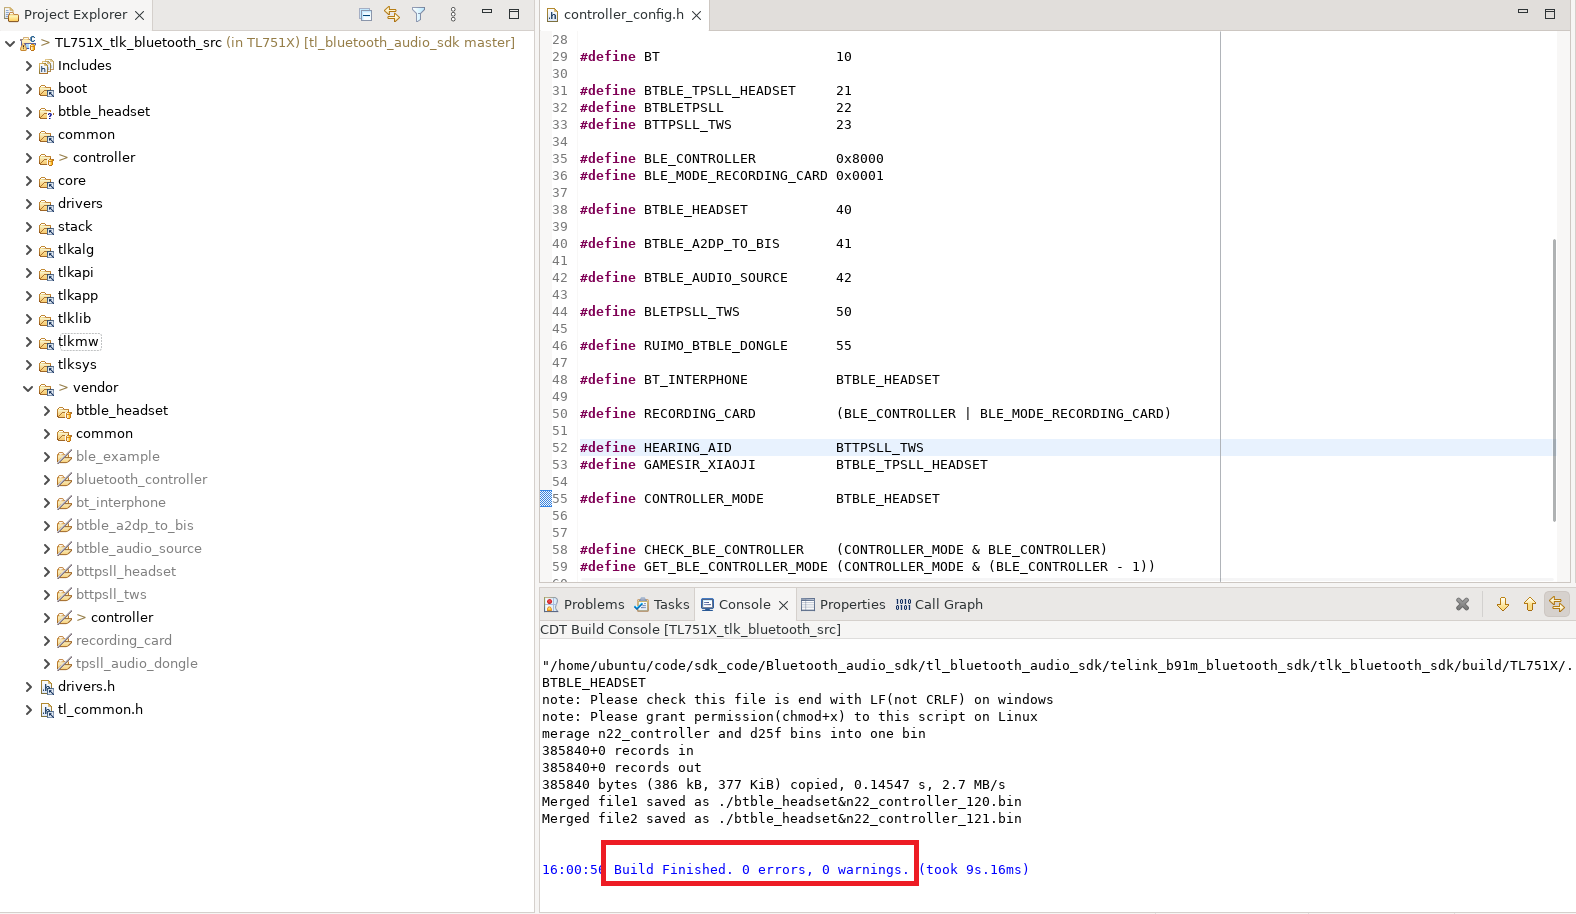
Observe the output in the Telink IoT Studio Console. If there is no error message and Build Finished. 0 errors, 0 warnings. is displayed, the compilation is successful.
Programming
Hardware Connection
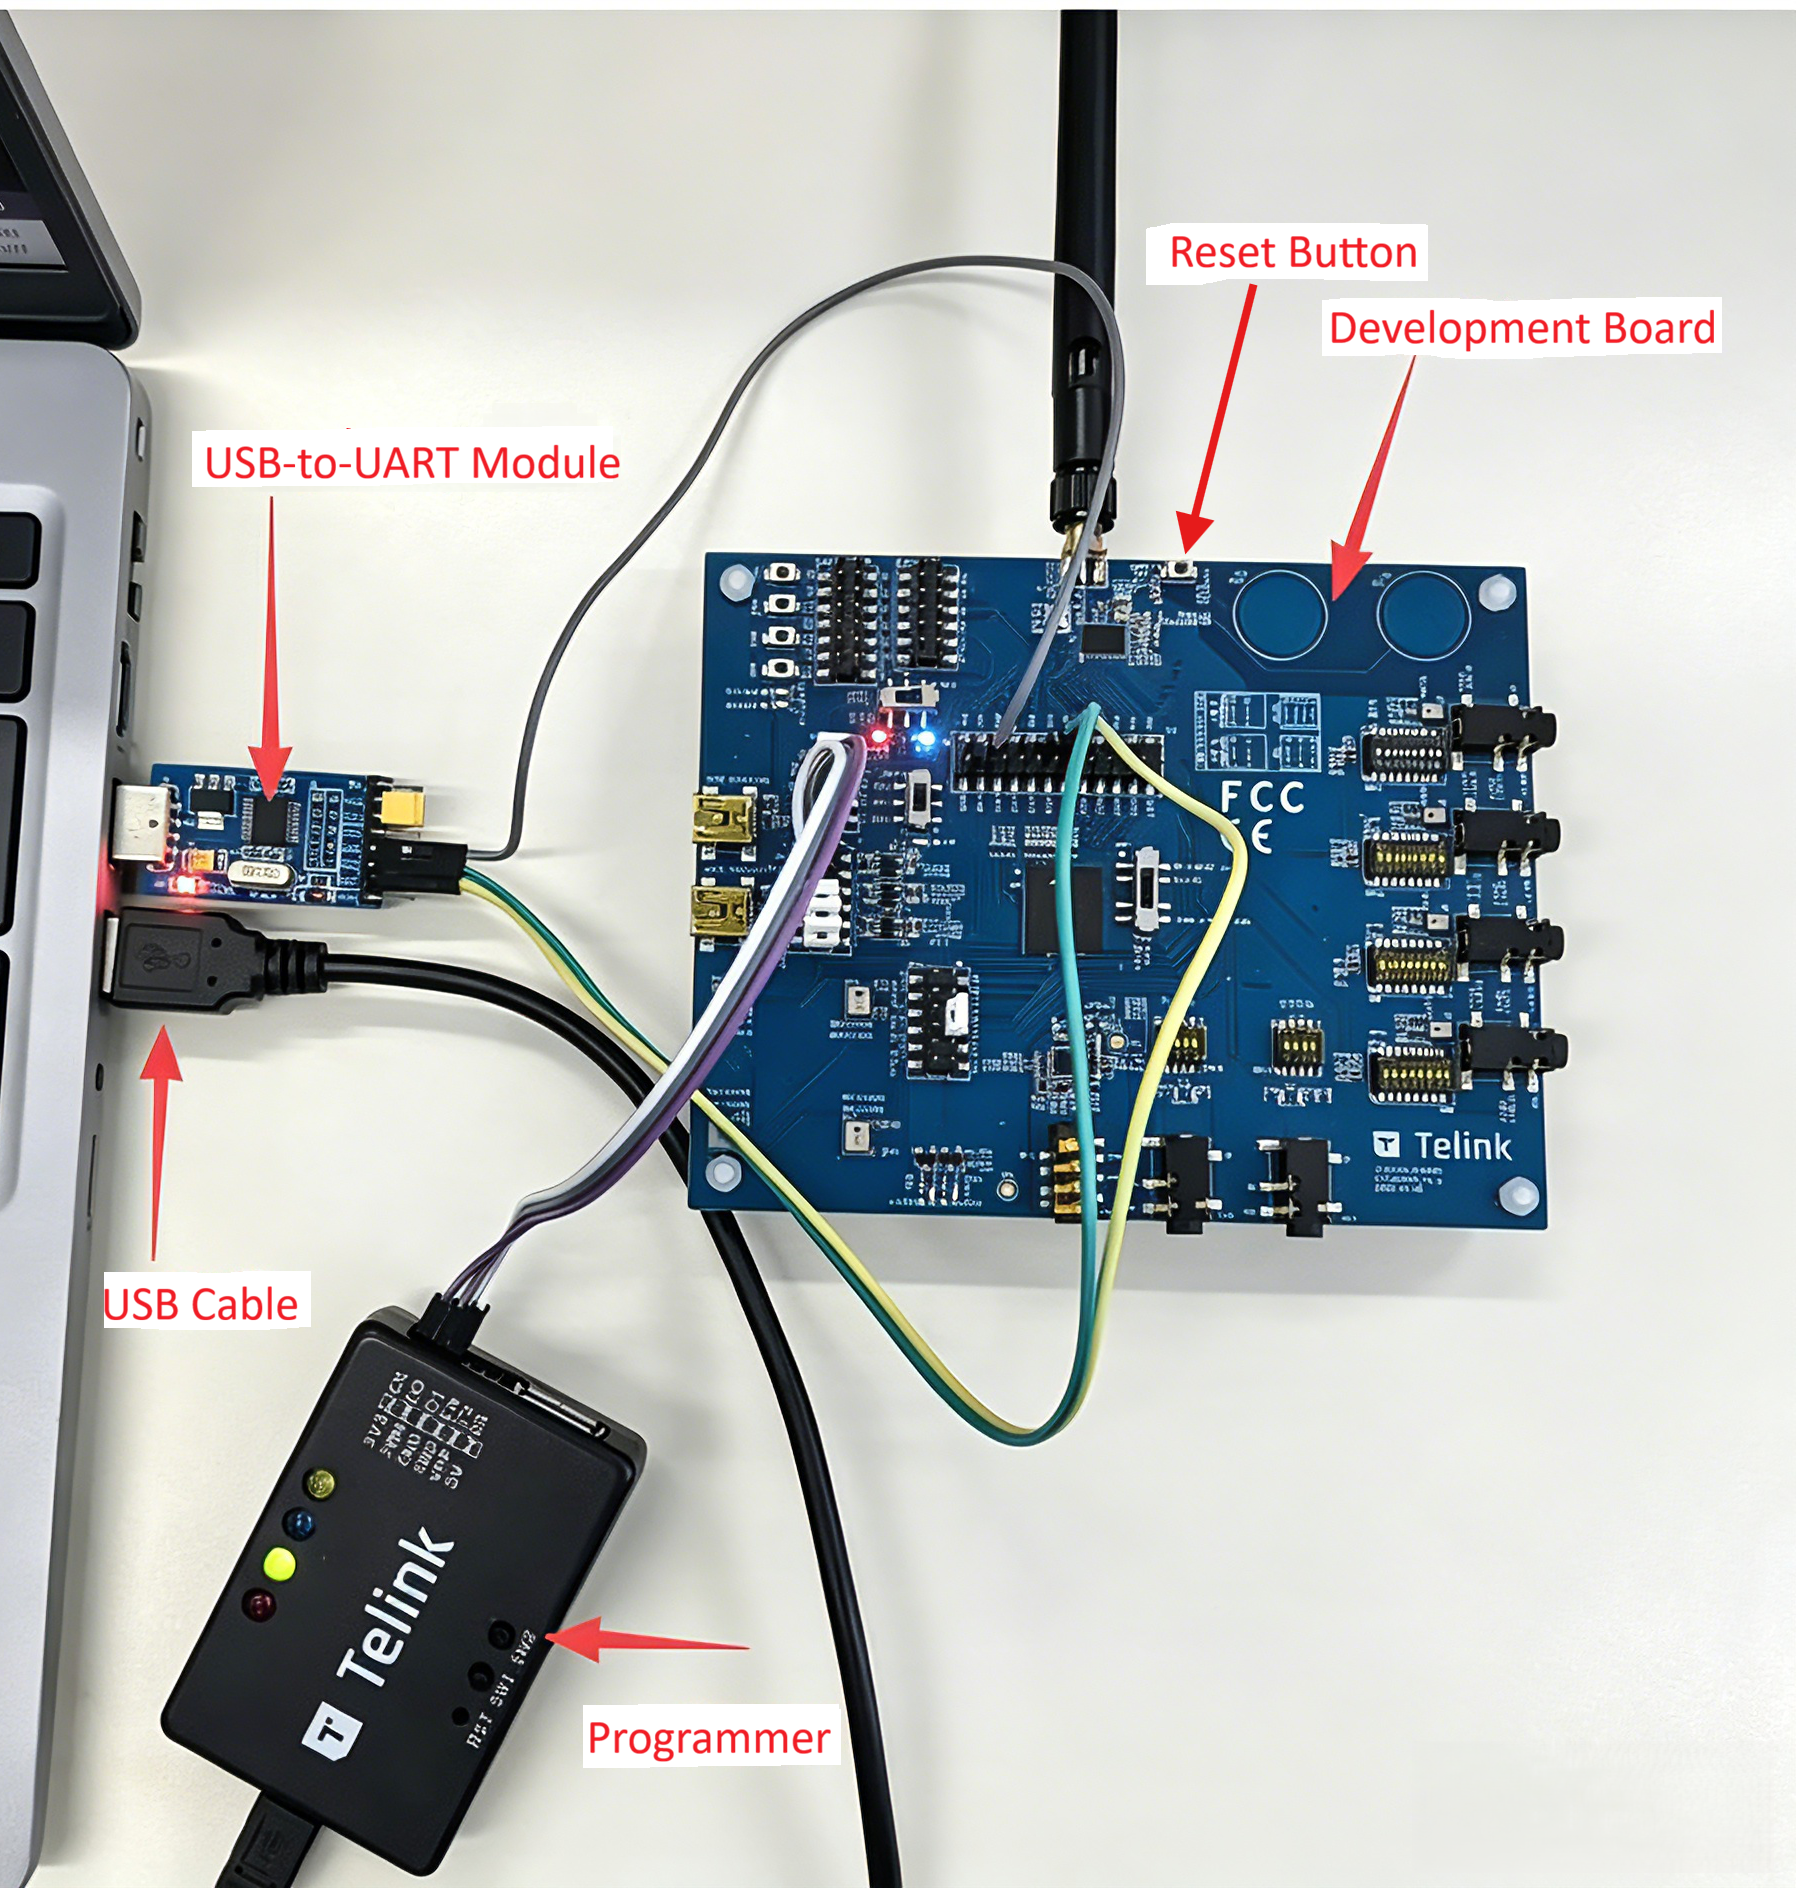
Before using the BDT tool, connect the PC, programmer, development board, and USB-to-UART module according to the following connection logic:
- PC <-> Programmer: Use a USB cable for connection. If the green indicator on the programmer remains on, it indicates that the programmer is successfully recognized by the PC.
- Programmer <-> Development board: Use Dupont wires for connection:
- Power line: VCC <-> VIN; GND <-> GND
- Data line (single-wire SWM bus): Connect the SWM pin of the programmer to the SWS pin of the development board.
- PC <-> USB-to-UART module: Connect the USB-to-UART module to the USB port of the PC.
- Development board <-> USB-to-UART module: Use Dupont wires for connection:
- USB-to-UART module TX <-> Development board RX (PB7)
- USB-to-UART module RX <-> Development board TX (PC6)
- USB-to-UART module GND <-> Development board GND (any GND pin)
Note
- To check the TX/RX pin definitions of the TL751x series development board: Open Telink IoT Studio, in the Project Explorer panel, click TL751X_tlk_bluetooth_sdk (in TL751X) -> vendor -> common -> boards, open the configuration file of the current development board, and search for
#define TLKDEV_SERIAL1_TX_PINand#define TLKDEV_SERIAL1_RX_PIN. - The steps to check TX/RX pin definitions of other chip series development boards are the same.
Install the Programming Tool
BDT is used to program the compiled firmware into the target chip or development board.
Please download the corresponding installation package according to your operating system:
- Windows: BDT.zip
- Linux: BDT_Linux.zip
Installation Steps (Windows environment as an example):
(1) Extract the downloaded tool package to a custom path.
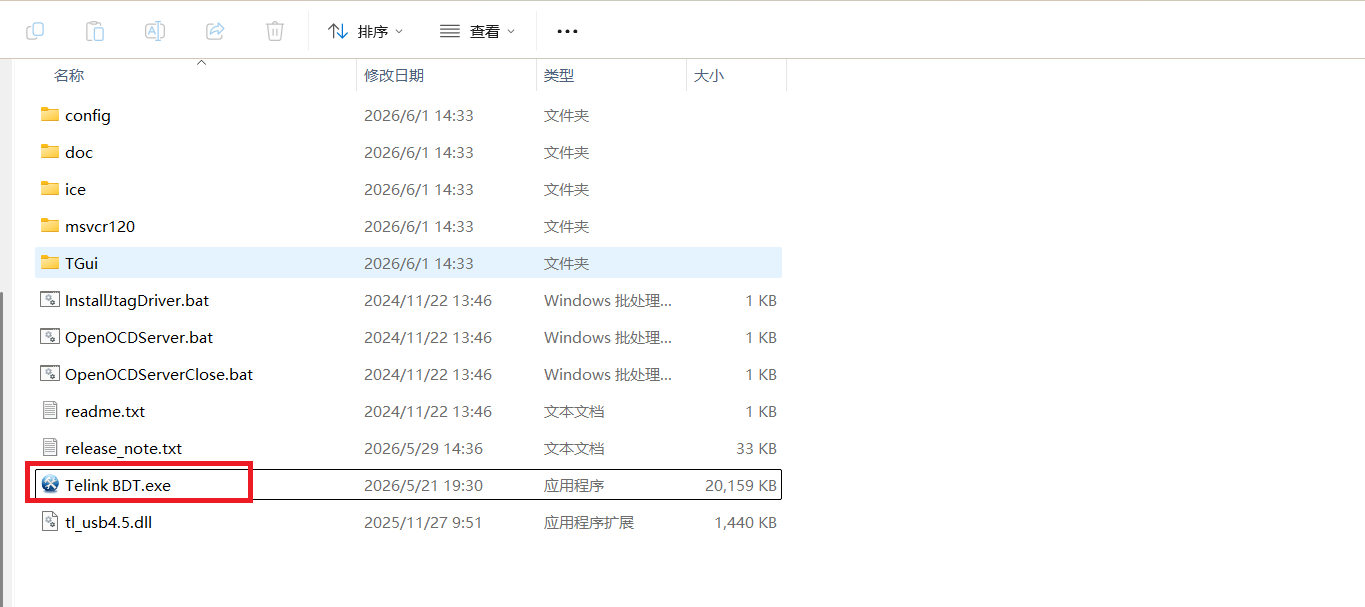
(2) Enter the extracted folder and double-click Telink BDT.exe to launch the tool.
Program the Firmware
(1) Refer to the Install the Programming Tool section, open the BDT tool, and select Programmer V1.0 - V3.0.
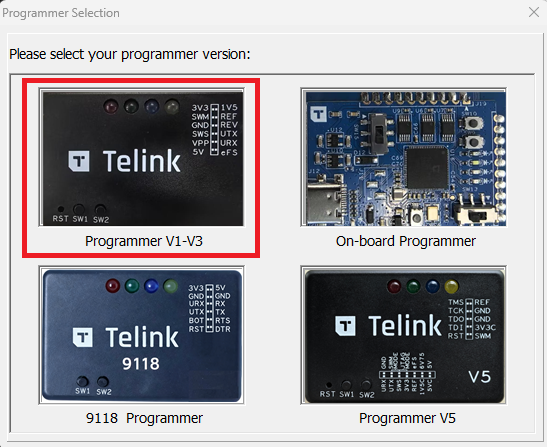
(2) Select the TL751X series, as shown below:
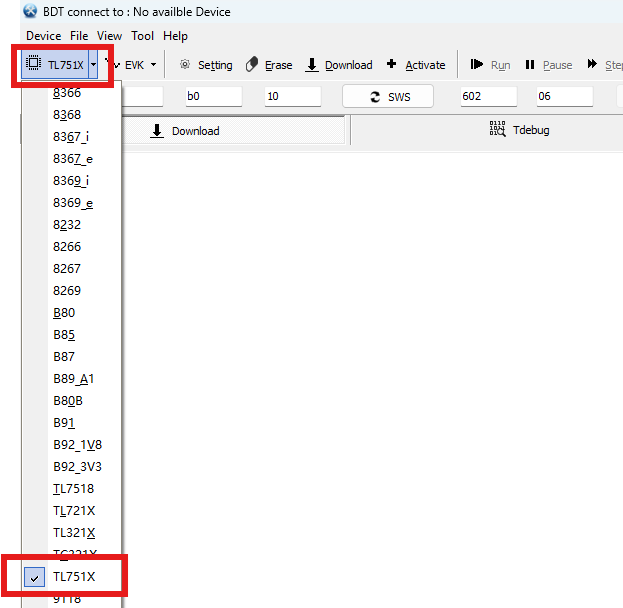
(3) Click Device -> Connect, select the device to connect. If the device is not detected, click Refresh, then click Connect again.
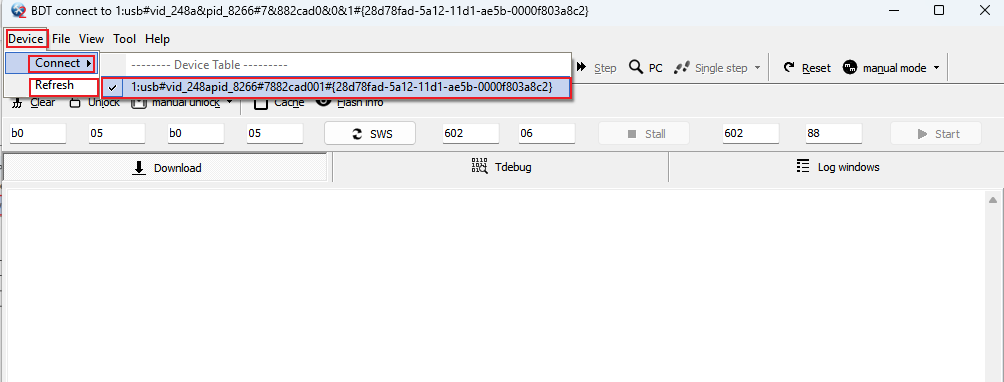
(4) Click File -> Open, select the bin file generated by compilation, and open it directly.
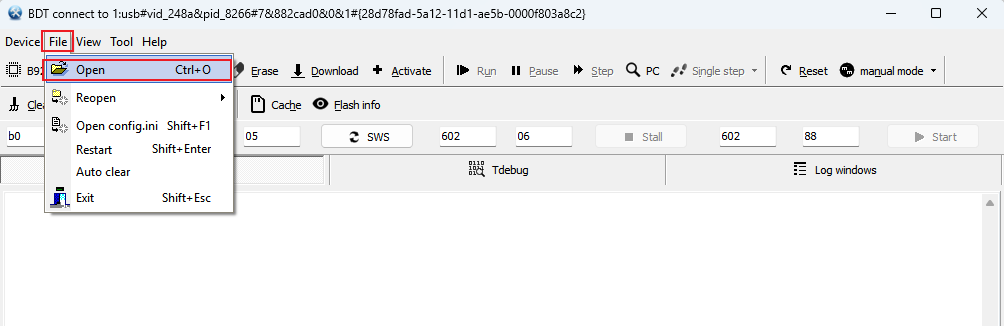
(5) Click Download to start programming. (If the flash protection function is enabled, click Unlock to unlock it before programming.)
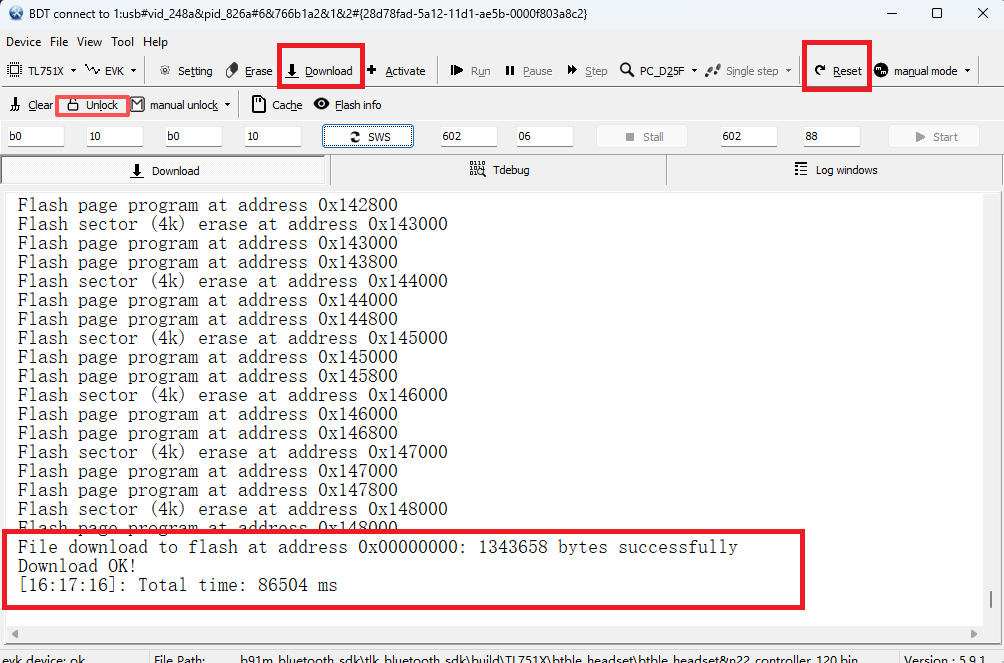
If the log displays Download OK!, the download is successful.
(6) After the download is complete, click Reset to restart the device.
Note
- When download fails, try clicking the Activate and Unlock buttons in sequence before downloading, and then perform the download again.

Run and Verify
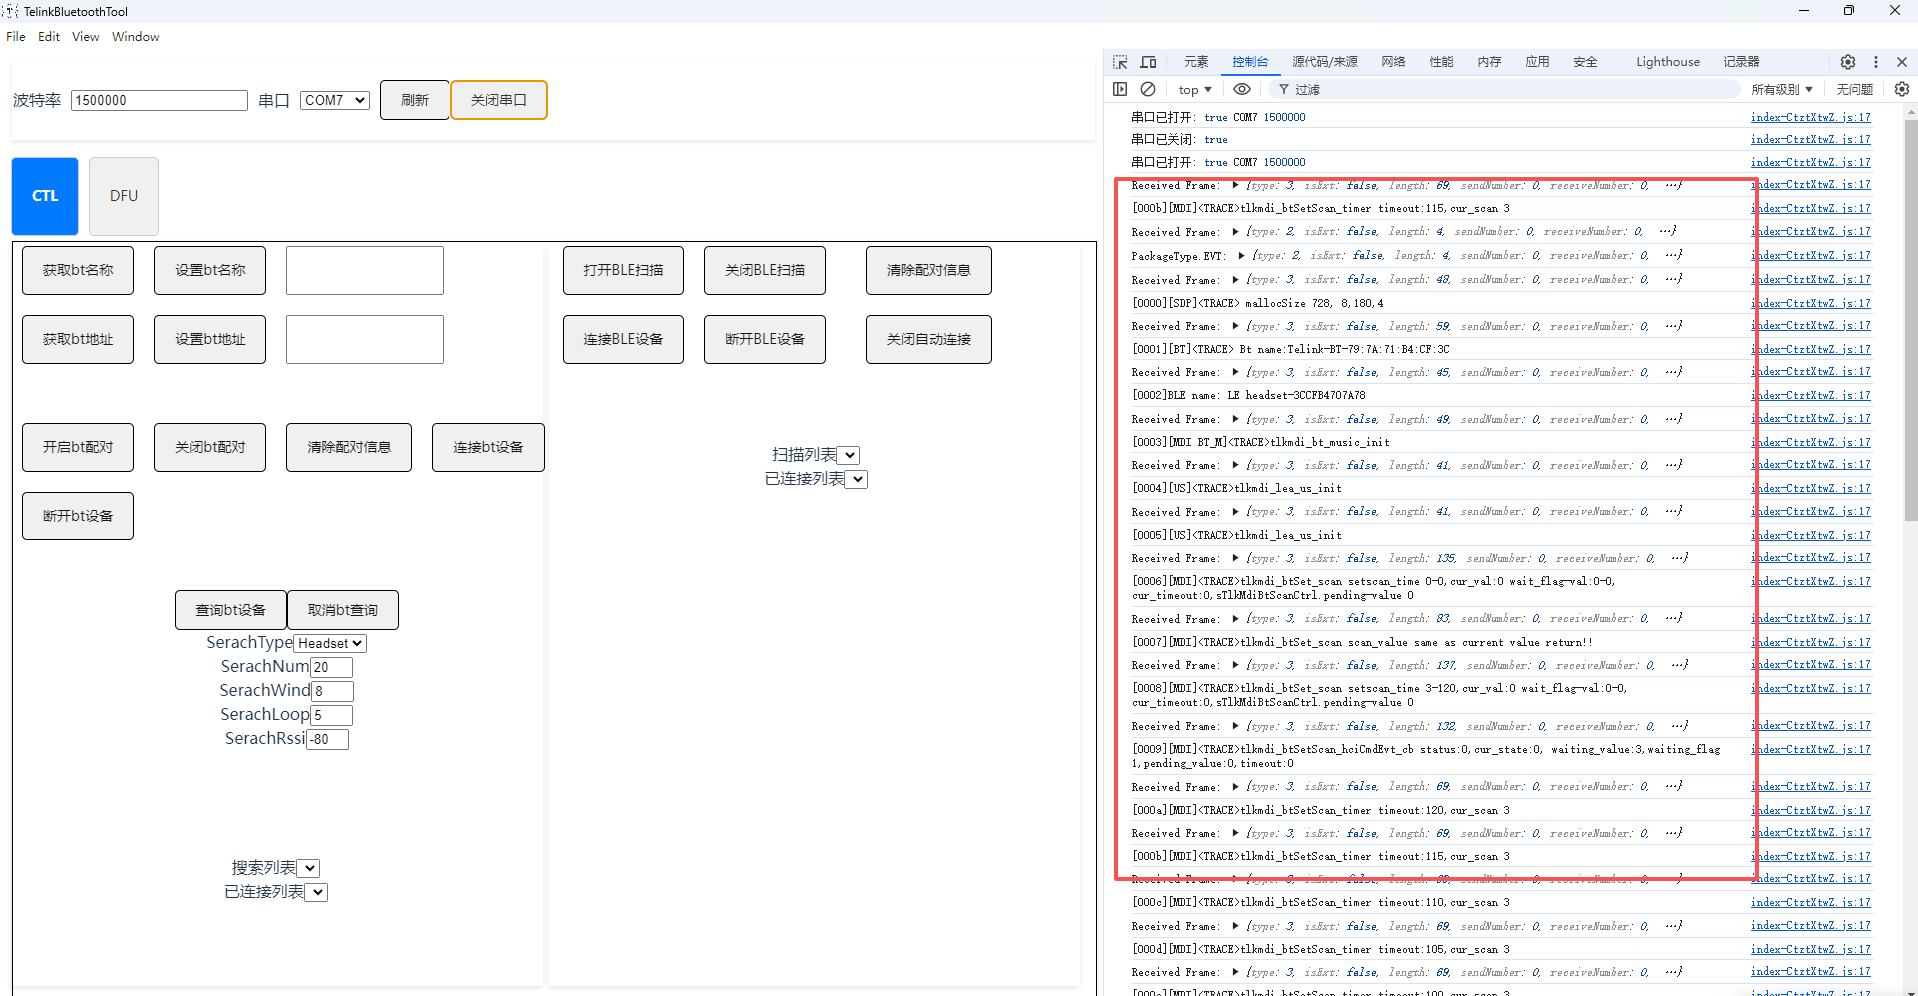
After programming is complete, the LED indicator on the development board flashes, indicating that the program is running normally. At this time, UART outputs logs. For detailed viewing methods, refer to the Logging section.
Debugging and Logging
Crash Debugging
When a system crash occurs, the PC (Program Counter) value can be obtained through the BDT tool. The problematic code location can then be identified by analyzing the corresponding list file.
When locating the issue based on the PC value, make sure that the corresponding bin file and list file are located in the same directory.
The PC value can be viewed as shown below.

Logging
The SDK supports log output through UART for debugging.
When using UART for log output, make sure that both the TLK_CFG_DBG_ENABLE and TLK_CFG_UART_TOOL_ENABLE macros are enabled in the target project's app_config.h file.
View Logs Using the Host Tool (Windows Only)
Host Software Installation:
TelinkBluetoothTool is a host software for Bluetooth devices, providing functions such as log viewing. This software is already integrated into the SDK package and does not need to be downloaded separately.
System Requirements:
- This software only supports Windows operating systems.
Installation Steps:
(1) Refer to Obtaining the SDK section, download and extract the SDK.
(2) Enter the tool folder in the SDK directory and extract the .zip package to a custom path.
(3) Enter the extracted directory and double-click TelinkBluetoothTool.exe to launch the tool.
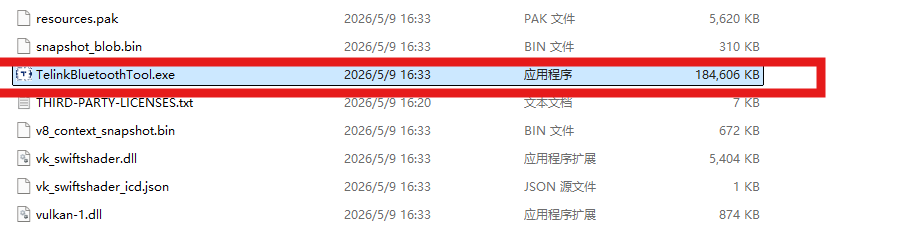
Steps to view logs:
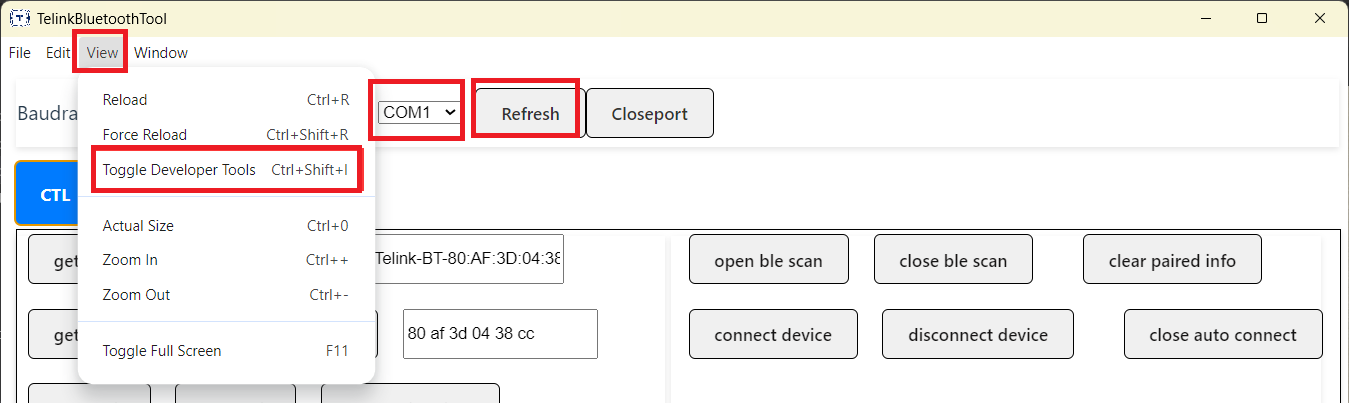
(1) Open the TelinkBluetoothTool application and set the baud rate to 1,500,000 bps.
(2) Click View -> Toggle Developer Tools -> Refresh in the top menu bar. Select the corresponding serial port from the Port drop-down list, and the log output can be viewed in the console.
Note
- If no log output is displayed in the console, try pressing the reset button on the development board. For the button location, refer to the hardware connection diagram in the Hardware Connection section.
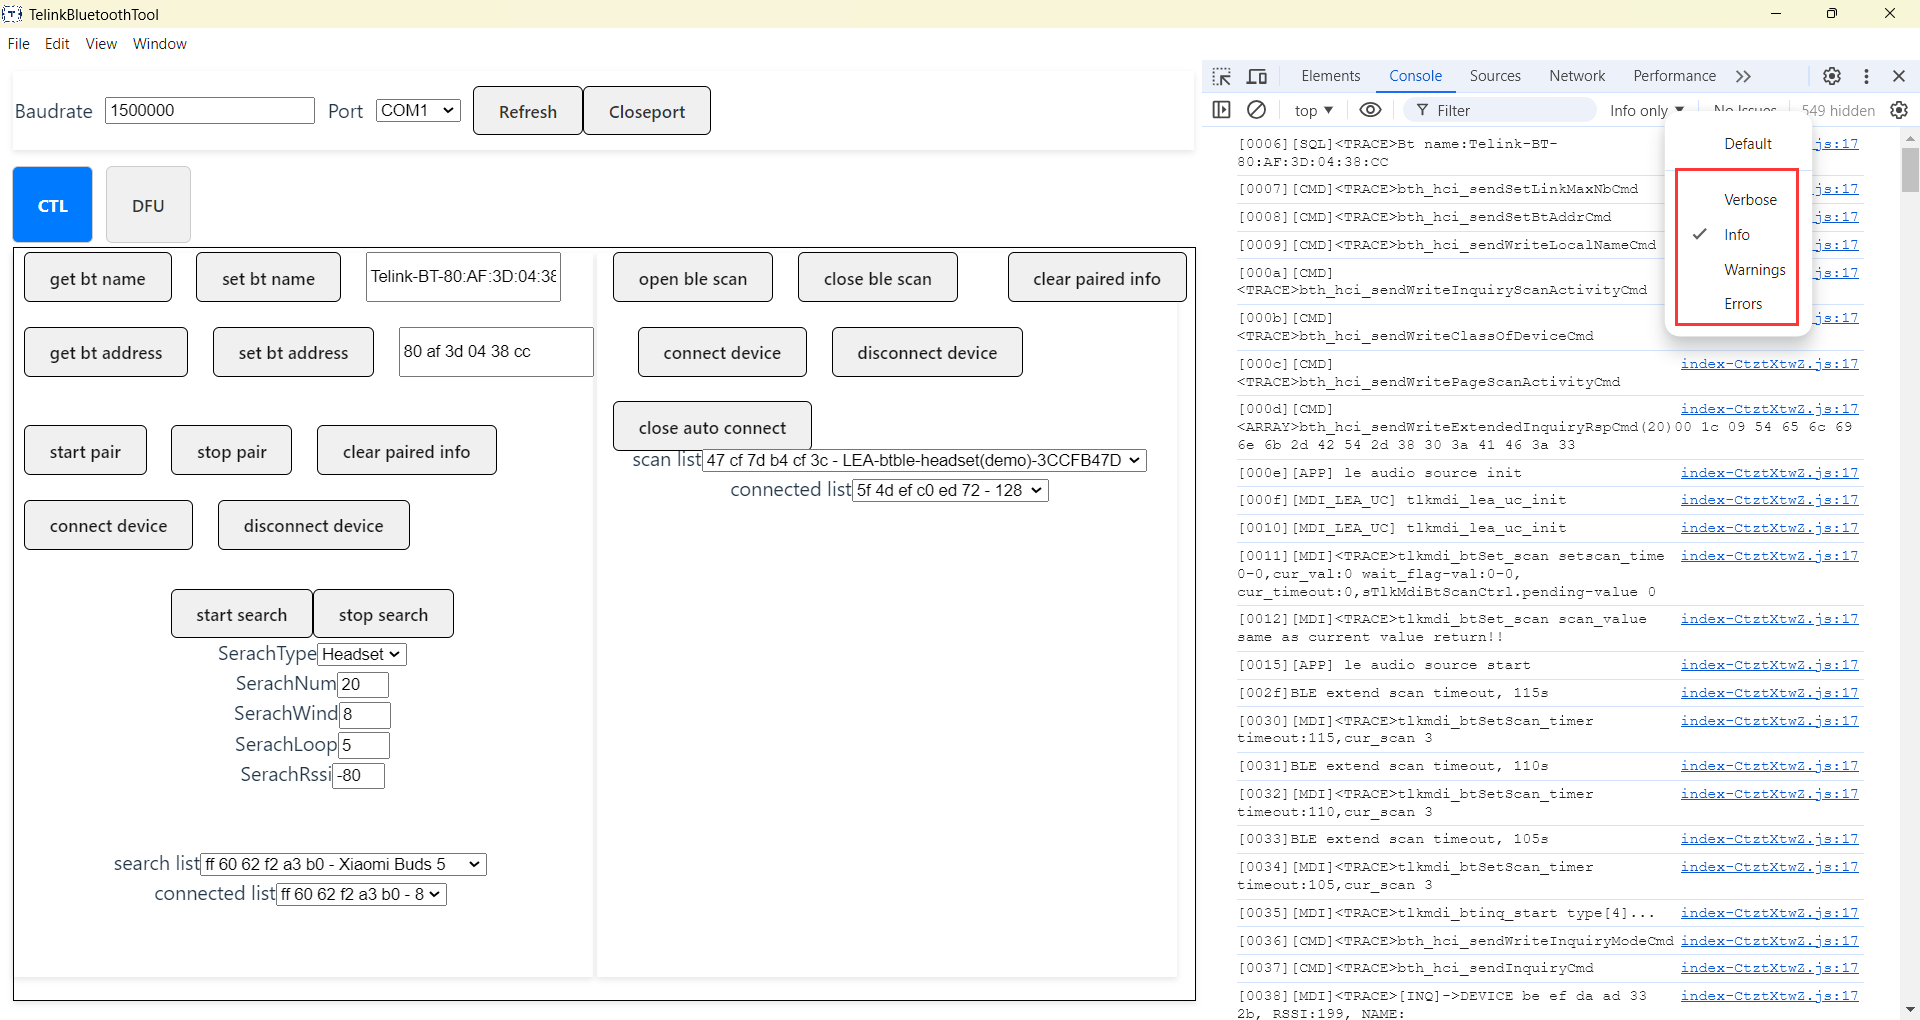
The log levels are divided into four categories:
- Verbose: Displays detailed interaction logs between the program and development board
- Info: Displays log messages output by the development board
- Warnings: Displays warning messages generated during program execution
- Errors: Displays error messages generated during program execution
You can select the required log level and use the filtering function to search for specific log information.
Appendix 1: FAQ
This section lists common issues that may occur during the SDK quick start process and their solutions.
Q: Why are some log messages not displayed?
A: This may happen when too many logs are output within a short period of time, causing UART buffer overflow and resulting in lost log messages. During debugging, it is recommended to increase the UART buffer size. You can modify the TLK_DEBUG_LOG_MEM_POOL_SIZE macro in the tlkdb_cfg.h file.
Appendix 2: bttpsll_tws Project Library Configuration
Before compiling the bttpsll_tws project for the TL751x chip series, the controller library must first be configured as lib751x_stack_controller_bttpsll_tws.a.
The configuration steps are as follows:
(1) In Telink IoT Studio, select the controller project from the drop-down list of 1.
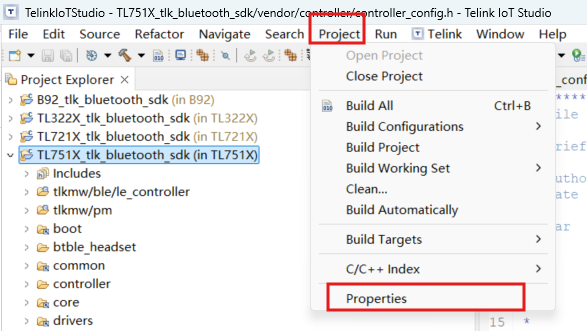
(2) Click Project, then select Properties from the drop-down menu.
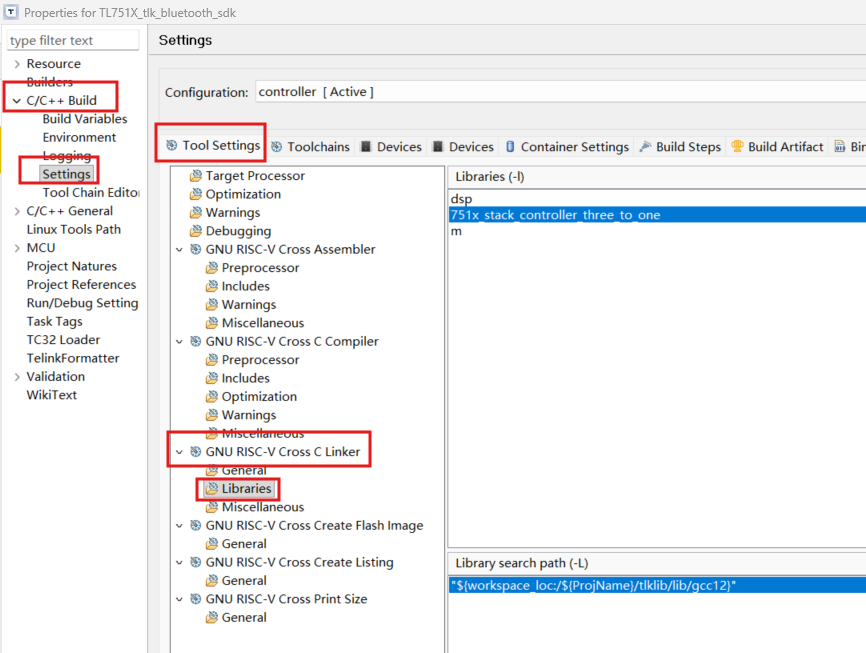
(3) In the pop-up Properties window, click C/C++ Build -> Settings -> Tool Settings -> GNU RISC-V Cross C Linker -> Libraries in the left sidebar.
(4) Select the 751x_stack_controller_three_to_one library file and click the delete button on the right side to remove it.
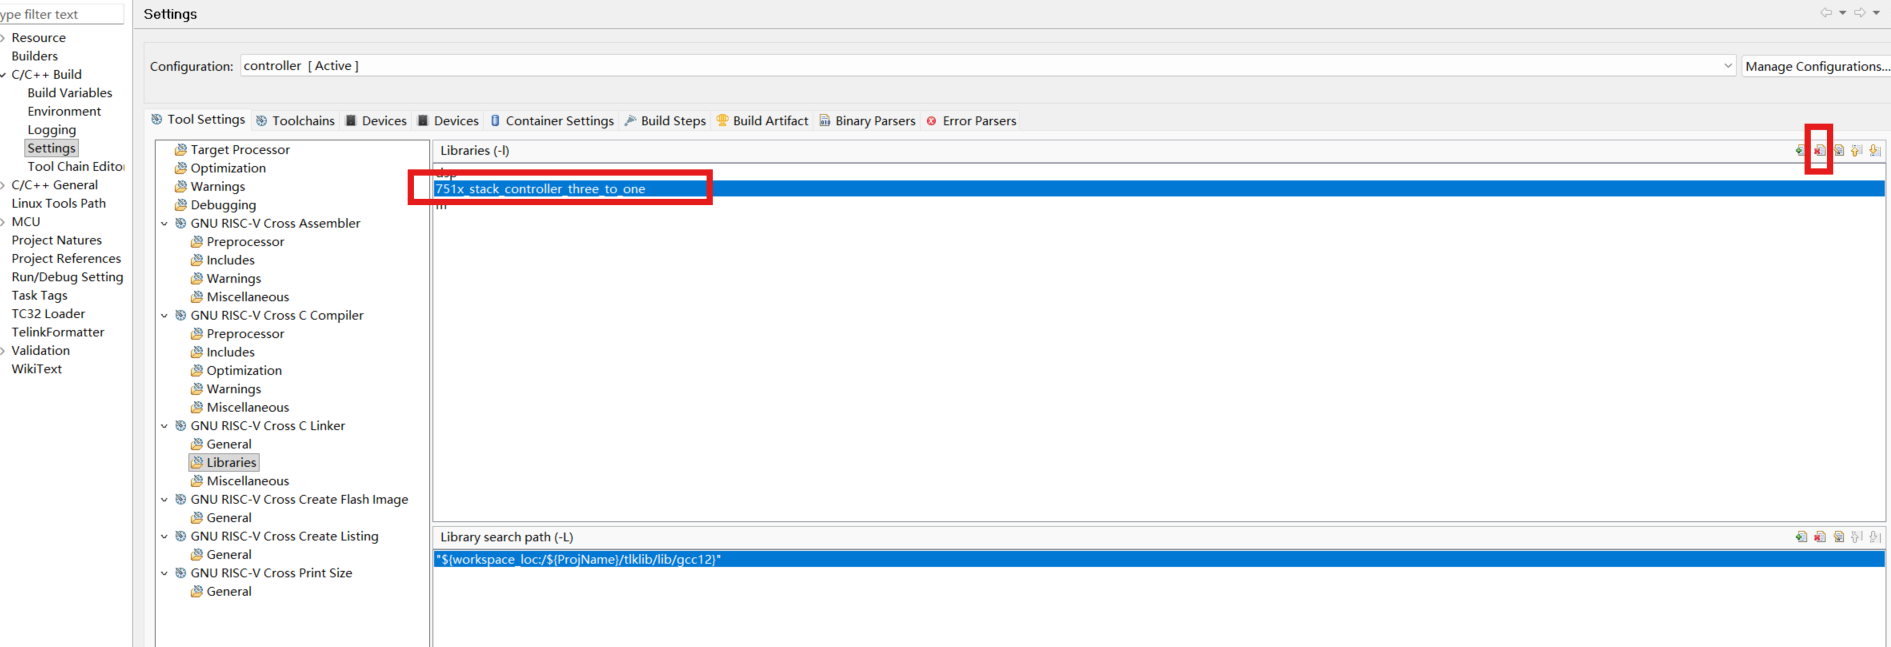
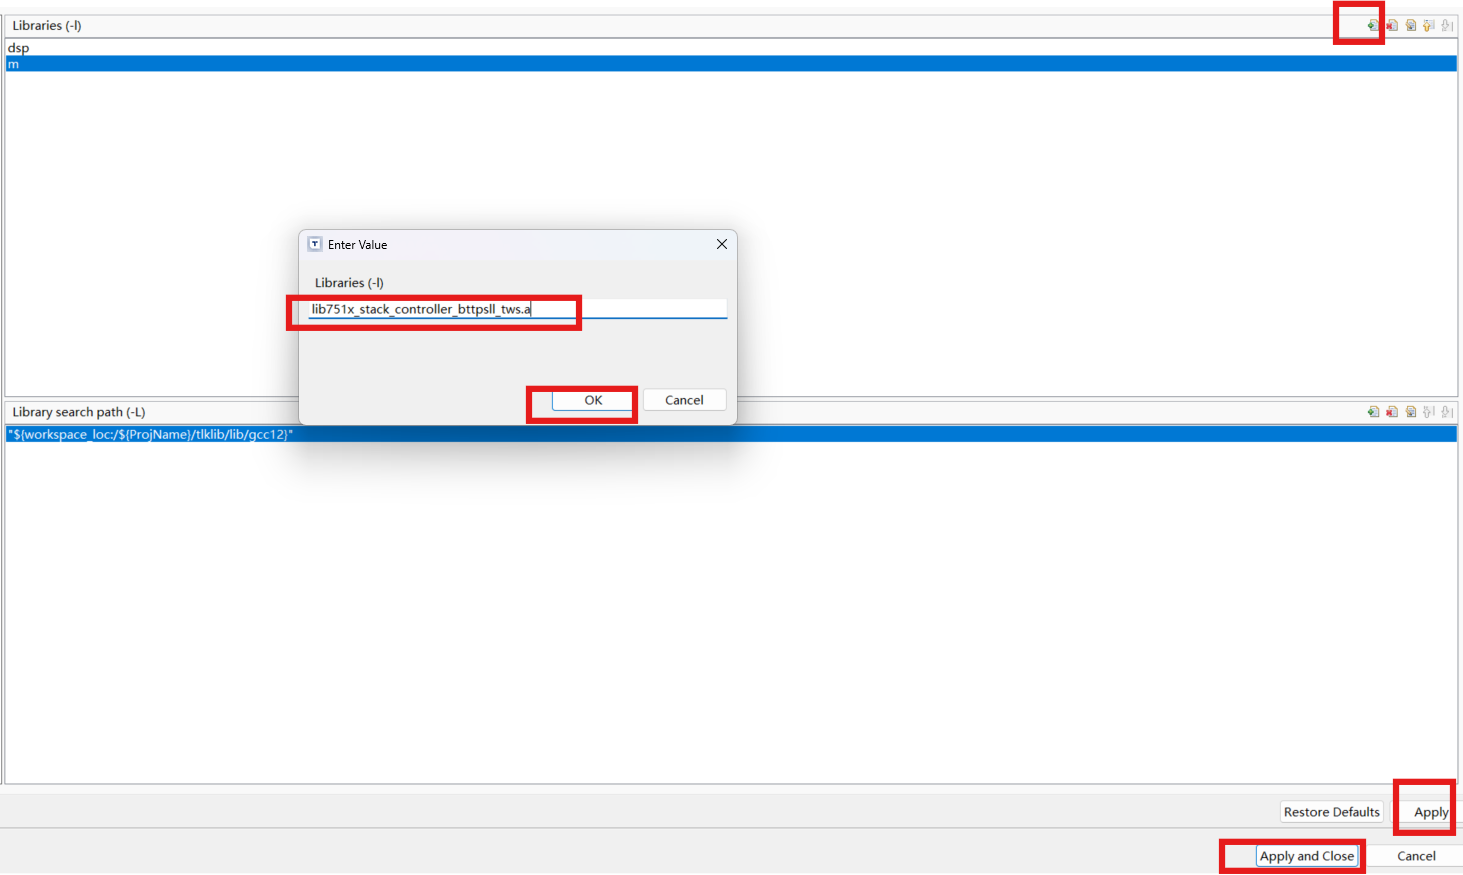
(5) Click the add button on the right side, enter lib751x_stack_controller_bttpsll_tws.a, and click the OK button to add the library file.
(6) Click Apply -> Apply and Close in the lower-right corner to apply the changes.