telink_zephyr_sdk Get Started
Overview
About this document
This document helps you quickly set up the Telink Zephyr SDK development environment on Ubuntu, obtain the SDK, install the build toolchain, configure the development environment, build an example, and verify that the environment is working correctly.
This document is intended for developers using the Telink Zephyr SDK for the first time.
By following this document, you will:
- Set up the Zephyr development environment;
- Obtain the Telink Zephyr SDK;
- Install the build toolchain;
- Configure the development environment;
- Build an example;
- Verify that the development environment is working correctly.
After completing this document, you can proceed with Bluetooth® LE, Thread, Matter, and other wireless IoT application development based on the Telink Zephyr SDK.
Applicable scope
This guide is the Telink-flavoured counterpart of the upstream Zephyr Getting Started Guide. The main differences are:
- the Telink fork repository/branch
- the Telink HAL binary blob fetch step
- the RISC-V toolchain selection.
For the full walkthrough (with screenshots and detailed tips) see Chapter Install Zephyr Project Environment in Telink Matter Developer Guide.
For detailed information on complete and accurate chip series, corresponding development boards, development platforms, toolchains, and SDK versions, refer to the latest Release Notes. Open the Release Notes page and select the Release Notes corresponding to your current SDK version from the dropdown list on the left.
Preparation
Hardware checklist
| Hardware | Description |
|---|---|
| PC | Linux distro as Ubuntu 24.04 LTS |
| Development board | Select a suitable development board according to the Release Notes |
| Programmer | Telink Programmer V5 |
| USB cable | Connects the PC and the programmer |
| Dupont wire | Connects the programmer and the development board |
For physical hardware, refer to Connect the hardware.
Software checklist
| Software | Description |
|---|---|
| Programmer software | Burning and Debugging Tool (BDT) |
| Toolchain | riscv64-zephyr-elf |
| SDK | Telink Zephyr SDK |
Set up the development environment
This section uses Ubuntu 24.04 LTS as an example to describe the Telink Zephyr SDK development environment setup process.
Notes
For other Linux distributions, refer to Install Linux Host Dependencies to install the required software dependencies.
Update and upgrade APT
Open Terminal and update the system.
sudo apt update
sudo apt upgrade
Install development tools
Install CMake, Python, Device Tree Compiler, and other tools required by the Zephyr build environment.
-
Install the Kitware APT repository to obtain the latest CMake version. Then install the required dependencies.
wget https://apt.kitware.com/kitware-archive.sh sudo bash kitware-archive.sh -
Install Zephyr dependencies.
sudo apt install --no-install-recommends git cmake ninja-build gperf ccache dfu-util device-tree-compiler python3-dev python3-pip python3-setuptools python3-tk python3-wheel xz-utils file make gcc gcc-multilib g++-multilib libsdl2-devNotes
AArch64 (ARM64) systems cannot provide the
gcc-multilibandg++-multilibpackages. If you are using an ARM64 Linux host, remove these two packages from the dependency installation list. -
Verify the versions of the dependencies.
python3 --version
cmake --version
dtc --version
Recommended versions:
Python >= 3.6
cmake version >= 3.20.0
dtc version >= 1.4.6
Install West
West is the multi-repository management tool officially provided by Zephyr. Follow the steps below to install West:
-
Create a Python virtual environment:
python3 -m venv ~/zephyrproject/.venv -
Activate the virtual environment:
source ~/zephyrproject/.venv/bin/activateOnce activated, the shell will be prefixed with
(.venv).Notes
You must activate the virtual environment every time you start a new terminal session. If not activated, the system will not find commands such as west, or commands may run against a different Python environment, causing errors.
-
Install West:
pip3 install west
Get the Telink Zephyr SDK
The Telink Zephyr SDK is built on the Zephyr Project. It is a fork of the zephyrproject-rtos/zephyr repository, hosted at telink-semi/zephyr, and adapted and extended for Telink RISC-V SoC platforms. The Telink-specific changes live on the release-v1.0-v4.1-branch branch.
The complete acquisition process is as follows:
Initialize the Telink Zephyr SDK
        ↓
Fetch the Telink HAL
        ↓
Install the Zephyr SDK toolchain
        ↓
Configure Zephyr SDK environment variables
Initialize the Telink Zephyr SDK
-
Initialize the west workspace with the Zephyr manifest. This creates the
~/zephyrprojectworkspace and clones the Zephyr main repository as the manifest repository.west init ~/zephyrproject cd ~/zephyrproject west updateNotes
Running
west initandwest updateto fetch the Zephyr source code in China mainland may take extra time, and some projects may fail to update from foreign servers. Use a mirror or proxy, or download the source bundle separately. -
Export the Zephyr CMake package so that application projects can use the Zephyr build system.
west zephyr-export -
Install Zephyr's Python dependencies.
pip3 install -r ~/zephyrproject/zephyr/scripts/requirements.txt -
Switch to the Telink Zephyr SDK branch to obtain the Telink platform adaptation code.
cd ~/zephyrproject/zephyr
git remote add telink https://github.com/telink-semi/zephyr
git fetch telink
git checkout release-v1.0-v4.1-branch
cd ..
west update
Fetch the Telink HAL
The Telink Hardware Abstraction Layer (HAL) is provided as a binary blob that supplies the BLE protocol stack. The fetch method depends on the chip family.
| HAL version | Supported chips | Fetch method |
|---|---|---|
| hal_v1 | TLSR9518ADK80D, TLSR9528A, TL321X, TLSR9118 | Run: west blobs fetch hal_telinkRe-run this command whenever you switch branches or update the workspace. |
| hal_v2 | TL322X, TL323X, TL721X | Navigate to: cd ~/zephyrproject/modules/hal/telink/hal_v2Run: chmod +x fetch_sdk.shExecute: ./fetch_sdk.sh |
Notes
fetch_sdk.sh uses a default repository (telink-semi/tl_ble_sdk_zephyr) and the latest commit. To pin a specific repository or commit, pass them as arguments:
./fetch_sdk.sh https://github.com/telink-semi/tl_ble_sdk_zephyr.git f50d422d780efb73af93b650ef7b8c6bf5a0b99b
Switch branches or commits
If you have completed the setup above and want to switch to a different Telink branch or commit, run the following commands:
cd ~/zephyrproject/zephyr
git fetch telink
git checkout <your-target-branch-or-commit>
cd ..
west update
After switching branches, re-fetch the HAL file by following the steps in Fetch the Telink HAL, choosing the version that matches your chip.
Install the Zephyr SDK toolchain
The Telink Zephyr SDK uses the riscv64-zephyr-elf toolchain.
-
Download the Zephyr SDK v0.17.0 minimal archive:
wget https://github.com/zephyrproject-rtos/sdk-ng/releases/download/v0.17.0/zephyr-sdk-0.17.0_linux-x86_64_minimal.tar.xz -
Verify the download:
wget -O - https://github.com/zephyrproject-rtos/sdk-ng/releases/download/v0.17.0/sha256.sum | shasum --check --ignore-missing -
Extract the archive to the target path (for example,
~/zephyr-sdk-0.17.0):tar xvf zephyr-sdk-0.17.0_linux-x86_64_minimal.tar.xz ~/zephyr-sdk-0.17.0Notes
The SDK may be installed in any of the following recommended paths: -
$HOME/zephyr-sdk[-x.y.z]-$HOME/.local/zephyr-sdk[-x.y.z]-$HOME/.local/opt/zephyr-sdk[-x.y.z]-$HOME/bin/zephyr-sdk[-x.y.z]-/opt/zephyr-sdk[-x.y.z]-/usr/zephyr-sdk[-x.y.z]-/usr/local/zephyr-sdk[-x.y.z][-x.y.z]is the downloaded SDK version, e.g.,-0.17.0.Warning
Do not move the SDK folder after installation.
-
Install the toolchain:
cd zephyr-sdk-0.17.0
./setup.sh -t riscv64-zephyr-elf -h -c
Notes
If you need the full Zephyr SDK (including host tools such as QEMU and OpenOCD), replace the minimal archive with the full archive:
wget https://github.com/zephyrproject-rtos/sdk-ng/releases/download/v0.17.0/zephyr-sdk-0.17.0_linux-x86_64.tar.xz
wget -O - https://github.com/zephyrproject-rtos/sdk-ng/releases/download/v0.17.0/sha256.sum | shasum --check --ignore-missing
tar xvf zephyr-sdk-0.17.0_linux-x86_64.tar.xz ~/zephyr-sdk-0.17.0
cd zephyr-sdk-0.17.0
./setup.sh -t riscv64-zephyr-elf -h -c
Configure Zephyr environment variables
Append the Zephyr environment script to ~/.bashrc so that west build can find the workspace in every new terminal.
echo "source ~/zephyrproject/zephyr/zephyr-env.sh" >> ~/.bashrc
source ~/.bashrc
Warning
If you skip this step, you may encounter west build errors later.
Build and flash the first example
Before starting formal Telink Zephyr application development, it is recommended to build and run the Blinky sample first to verify that the Telink Zephyr SDK development environment is configured correctly. This example uses the TL323x EVK.
Build the first example
- Navigate to the Zephyr root directory:
cd ~/zephyrproject/zephyr -
Build the Blinky sample:
west build -p auto -b tl3238x samples/basic/blinky -d build_blinky -
Check the build result.
After a successful build, you will find
zephyr.binin the build_blinky/zephyr/ folder.
Flash the firmware
The BDT tool is used for firmware flashing. BDT is the official programmer for Telink SoCs. It is available for both Windows and Linux. This document uses Linux BDT as an example.
Step 1: Connect the hardware
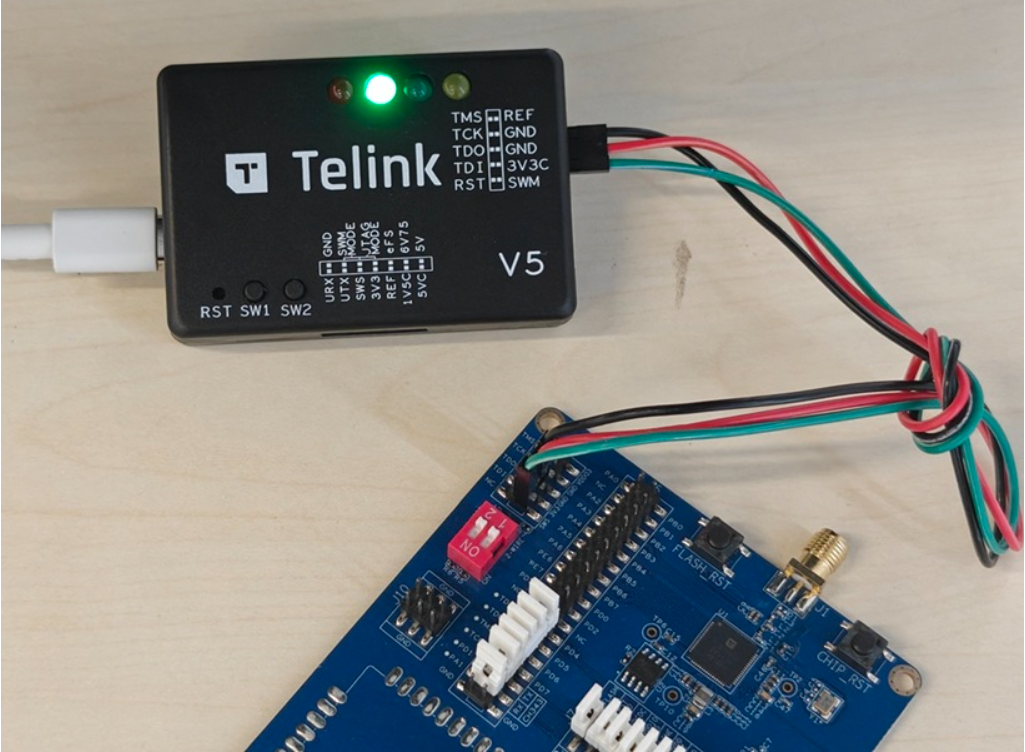
Before using the BDT tool, connect the PC, the programmer, and the target board as follows:
- PC ↔ Programmer: Connect using a Mini-USB cable. If the green indicator LED on the programmer stays solid, the programmer has been successfully recognized by the PC.
- Programmer ↔ Target board: Connect using Dupont wires:
- Power lines: 3V3C ↔ 3V3; GND ↔ GND
- Data line (single-wire SWM bus): Connect the programmer's SWM pin to the target board's SWS (Swire) pin.
Step 2: Download BDT
-
Install the dependencies required by BDT.
sudo apt update sudo apt install -y libgtk-3-dev libusb-1.0-0-dev -
Create a BDT tool directory.
mkdir -p ~/tools/telink-bdt -
Download Telink BDT for Linux to the
~/Downloadsdirectory and extract the BDT_Linux.zip package.cd ~/Downloads unzip BDT_Linux.zip -d ~/tools/telink-bdt/The extracted
BDT_Linuxdirectory contains two tool packages: TGui-BDT and Telink-BDT. -
Extract TGui-BDT.
cd ~/tools/telink-bdt/BDT_Linux/ tar -xzf TGui-BDT-Linux-V1.0.2.tar.gz -C ~/tools/telink-bdt/ -
Launch TGui-BDT.
cd ~/tools/telink-bdt/TGui-BDT-Linux-V1.0.2/
sudo ./TGui
After launching, you can use TGui-BDT to flash the TL323X development board.
Step 3: Flash the firmware
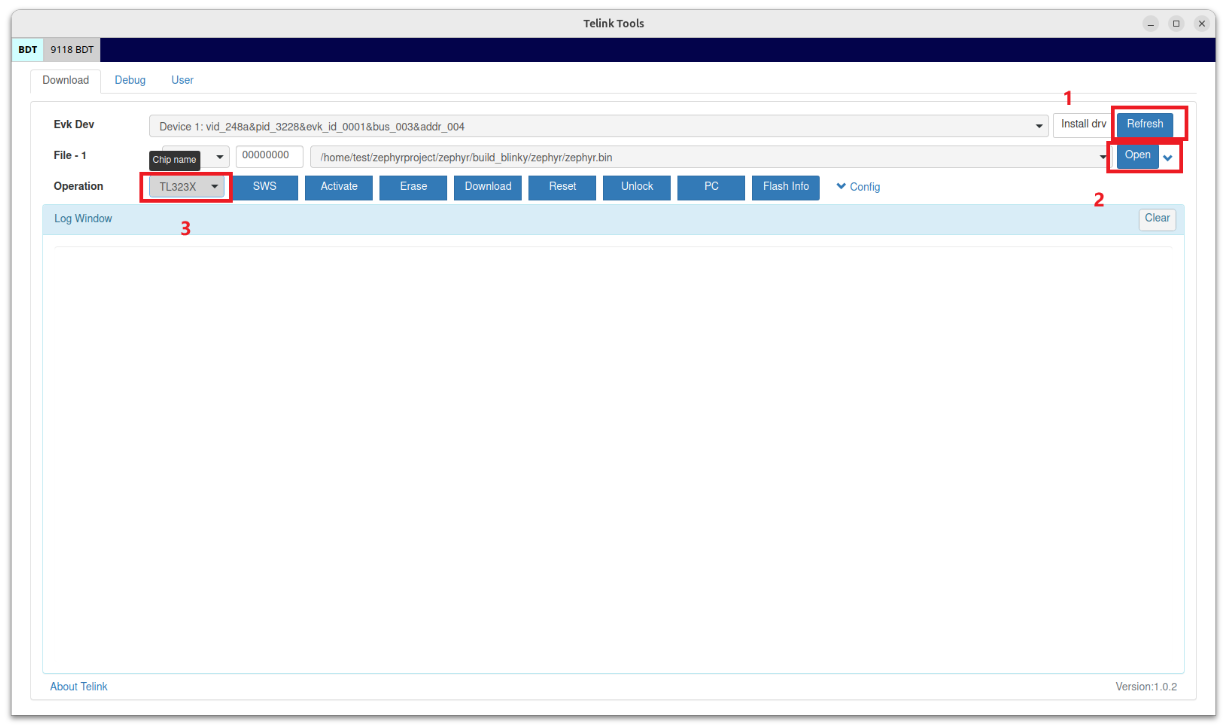
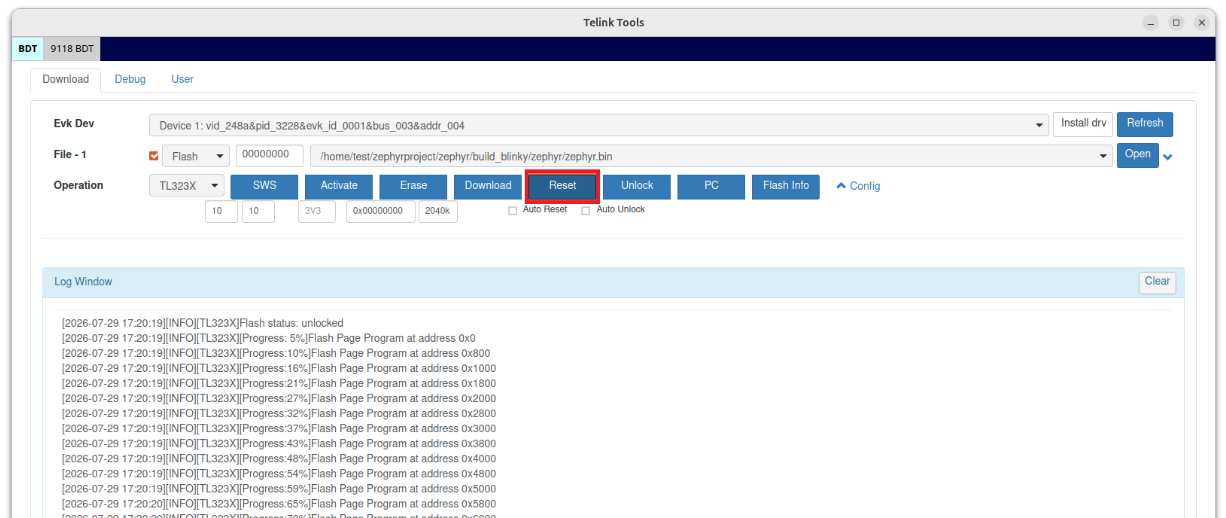
- Select the chip series and firmware for the target board.
In the chip dropdown menu on the left, select the target chip that matches your development board, e.g., TL323x, then select the firmware binary file to flash, e.g., build_blinky/zephyr/zephyr.bin.
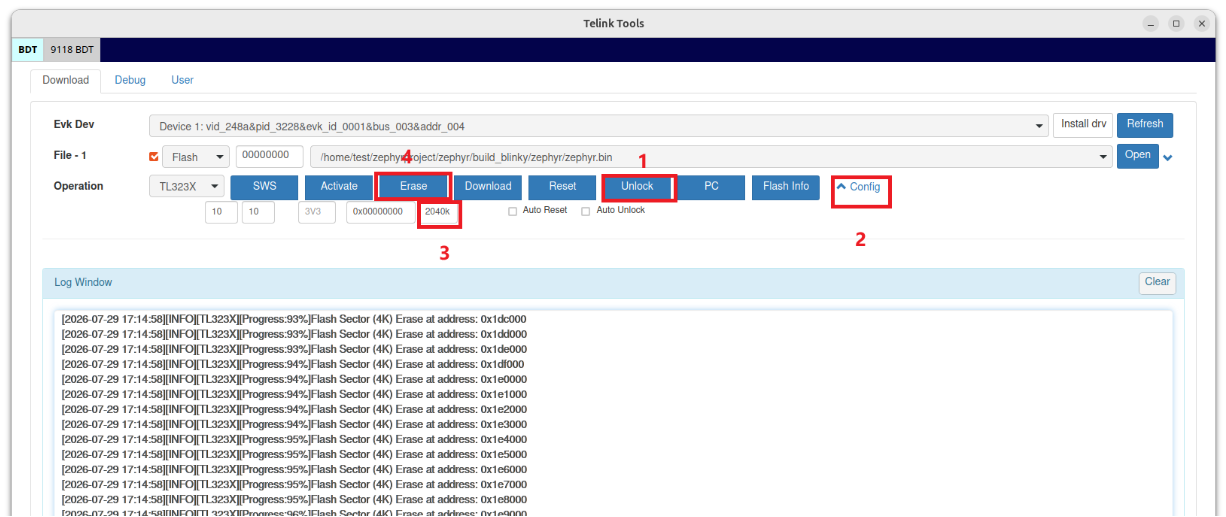
- Erase the flash. Set the erase size to 2040 KB, then execute the flash erase operation. For development boards with 2 MB external flash, the last 8 KB is reserved for SoC data, so the maximum erasable area is 2040 KB.
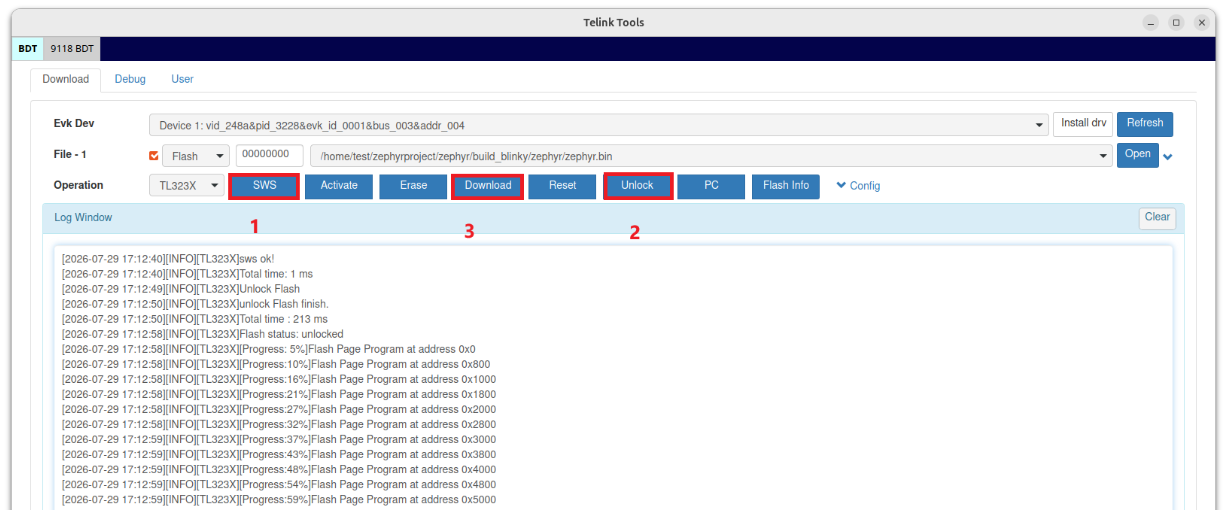
- Verify SWS, unlock the flash, and download the firmware. Click SWS first to confirm that communication with the target device is working. Click Unlock to remove flash protection, then click Download to program the selected firmware to the device.
- Reset the development board. After flashing completes, power-cycle the development board (or press its Reset button) to start the new firmware.
Verify the running results
After flashing the firmware, follow the steps below to verify whether the example is running properly on the development board.
Operation steps
- After flashing is complete, the development board will automatically reset; if it does not reset automatically, press the Reset button on the development board to reset.
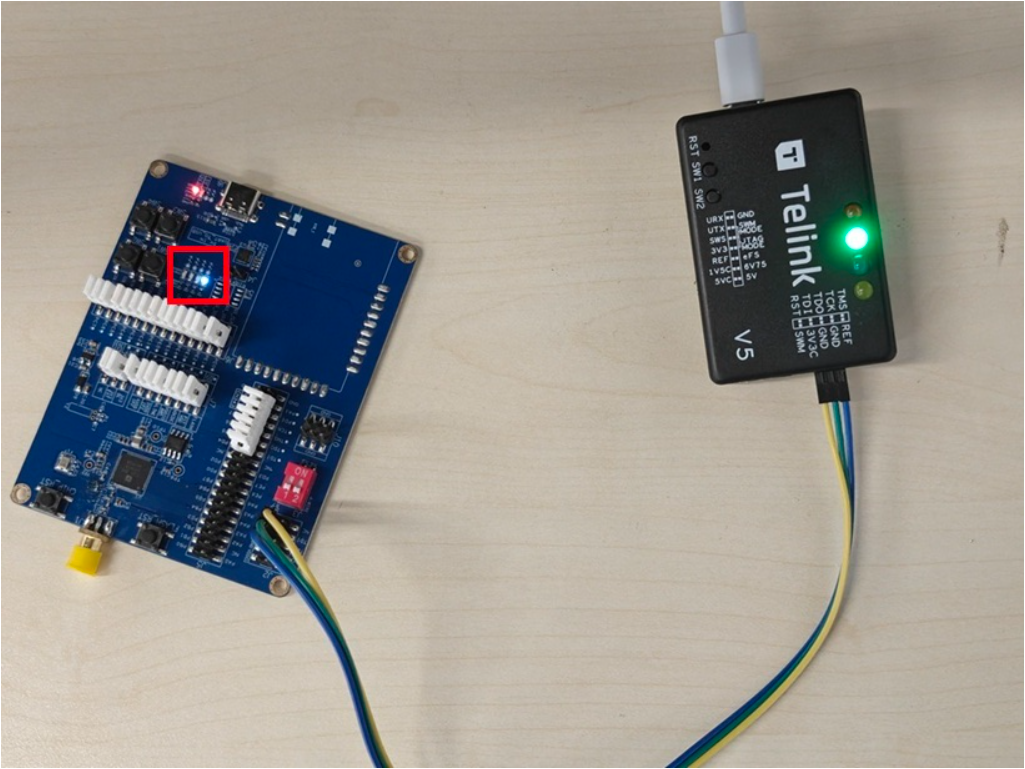
- The Blinky sample toggles the LED on the development board. Observe the onboard LED status to confirm whether the LED blinks at a steady interval.
Expected results
When the program is running normally, you will observe the onboard LED blinking at a steady interval (default frequency is approximately 1 Hz, blinking once per second).
Related documents and resources
Documentation
| Document | Description |
|---|---|
| Telink Matter Developer Guide | Telink Matter SDK software architecture, repository structure, and functional module descriptions |
Community and resources
| Resource | Description |
|---|---|
| Telink Official Forum | Technical exchange and support |
| Telink Official Website | Product center and documentation center |
| Zephyr Project | Zephyr official community |
| Zephyr Project Documentation | Zephyr technical documentation |
| Zephyr Samples | Zephyr sample programs |
| API Reference | API reference |
| GitHub | SDK source repository |
| Contribution Guide | Issue submission, code contribution, and development guidelines |
Appendix 1: Frequently Asked Questions
Chip status shows Not Activate
- Problem description: BDT displays the following message when connecting to the chip:
Not Activate
- Solution: Before clicking Download, click Activate to activate the chip first. After "Activate MCU ok" appears, proceed with the Download operation to flash.
Blinky sample LED does not blink after running
- Problem description: After firmware flashing and resetting the development board, the onboard LED does not blink as expected.
- Solution: Check the followings:
- Confirm that the firmware was successfully flashed;
- Confirm that the development board is properly powered;
- Check that the development board jumper configuration is correct;
- Confirm that the current project configuration matches the development board.